Monday, May 30, 2011

Peanut Butter Chocolate Chip Sugar Cookies


Last week, I was sorting some old recipes I had and came across a cookie recipe that looked interesting.  It called for a tube of cookie dough with other ingredients added so that it's no longer a sugar cookie.  I decided to try it out and was very pleased with the outcome!  I used this recipe for the dough, but didn't refrigerate it, since I needed it to be soft.  I have to apologize because I neglected to take a picture of the finished product, but next time I make these, I'll be sure to take a picture and add it.  I will tell you, though, that the cookies don't really spread out much as they bake, so they end up being almost the same shape when they come out of the oven as when they went in.

Peanut Butter Chocolate Chip Sugar Cookies
2 cups sugar cookie dough (or an 18 oz tube sugar cookie dough), unbaked and softened
1/3 cup peanut butter (I used creamy, but chunky would be fine, too)
1/2 cup chocolate chips
1/2 cup M&M's
1/2 cup quick oats

Preheat oven to 375 degrees.

Combine sugar cookie dough, peanut butter, chocolate chips, M&M's, and oats in a large bowl. 


My 2-year-old was excited that she could help me make these cookies!


Scoop rounded tablespoonfuls onto an ungreased cookie sheet. 


Bake for 16-18 minutes, or until cookies are a light golden brown.  Remove from oven and cool on cooling racks.

As I've mentioned before, to keep the cost down, wait for M&M's to go on clearance (i.e. after Halloween, Christmas, or Easter) and stock up.  Additionally, if you make your own sugar cookie dough, as opposed to buying pre-made dough, you'll also save money.  The sugar cookie recipe listed on this site makes enough for two batches of these cookies.  Each batch may not have 2 cups of dough exactly, but if you cut the dough in half, it will be close enough.

Friday, May 27, 2011

Coleslaw for People Who Don't Like Coleslaw


Last week I mentioned that I don’t like coleslaw because of the texture of raw cabbage.  And I can honestly say it’s not from lack of trying it.  Every time I come across it, whether at someone else’s house or at a restaurant, I try it, hoping I’ll like it.  Our dad makes the most amazing pulled pork and always serves it with coleslaw.  I take at lease one bite every time, but have yet to develop an affinity for it.

A few weeks ago, I had one of those light-bulb-coming-on moments, facilitated by my husband.  I had used some of that tilapia in my freezer to make fish tacos.  Rather than serving them with coleslaw, as is often done, I served them with sautéed cabbage and carrots.  I loaded corn tortillas with pan-fried tilapia, the cabbage and carrots, homemade tartar sauce, and hot sauce.  They were really good!  (Recipe to be posted at a later time.)

As Robbie was working on his second taco, he said it tasted like I had put coleslaw in it.  Serendipity!  I tossed some of the cabbage and carrots into a bowl, mixed in some tartar sauce, and voilà–coleslaw without raw cabbage!!

If you look up the Wikipedia article on coleslaw, you will read that the only constant is cabbage.  After that, the options are endless.  You can add different vegetables and use different dressings.  I made two different slaws that I will share here.  Feel free to alter them to suit your taste.  Like it tangier?  Add more vinegar.  Like it sweeter?  Add more sugar.  You can also use sour cream-or yogurt-based dressings.

Coleslaw for People Who Don’t Like Coleslaw
1 batch sautéed cabbage and carrots, refrigerated
1 c. mayonnaise
1 Tbsp. vinegar
1 Tbsp. sugar
Additional salt and pepper, to taste


Place sautéed cabbage and carrots in medium mixing bowl; set aside.  In small bowl, combine mayonnaise, vinegar, sugar, salt, and pepper.


Pour over cabbage and carrots; mix well.


Our Near to Nothing great grandmother made a very different kind of coleslaw.  Rather than a creamy dressing, hers has an oil and vinegar dressing.  While I personally would tweak the recipe to make it tangier and less sweet, I will give her original recipe here, substituting sautéed vegetables for fresh.

Great Grandma’s Coleslaw
1 batch sautéed cabbage and carrots, refrigerated
¾ c. sugar
½ c. olive or vegetable oil
½ c. white vinegar
1 Tbsp. celery seed, optional
Salt and pepper, to taste

Place cabbage and carrots in medium mixing bowl; set aside.  In small saucepan, heat sugar, oil, vinegar, and celery seed to boiling.


Pour over cabbage.


Let stand at room temperature until cool.  Mix and chill.  Add salt and pepper as desired.


Wednesday, May 25, 2011

Trail Mix


Last weekend, my husband went backpacking, which requires high calorie, compact, easily transportable food and snacks.  One thing he wanted was trail mix.  Now, I could just go buy a bag of trail mix and be done, but trail mix can be quite pricey.  Instead, I set out to get the ingredients to make trail mix.

The great thing about making your own trail mix is 1) you can make it cheaper than you can buy it and 2) you can customize it.  You see, my ideal trail mix consists of M&M's, peanut butter chips, peanuts, and almonds.  Notice, it contains no raisins.  My husband, however, has different tastes.

In order to make budget-friendly trail mix, keep an eye out for sales and clearance items.  For example, I bought the peanuts and cranberries on sale and I had the M&M's on hand from Halloween clearance.

Halloween-colored M&M's: weird colors, but who really cares?  :)

Trail Mix
2 cups peanuts
3/4 cup M&M's
1/4 cup peanut M&M's
1/2 cup raisins
1/2 cup dried cranberries

Place desired ingredients in a bowl; mix.  Eat.


It's as simple as that!  You don't have to stick to these ingredients and proportions.  This is easily customizable to suit your preferences!!!  Get creative and have fun!

Monday, May 23, 2011

Out with the Old, In with the New: My New Cookware!


Back in January, Kimiko wrote a post about cookware.  She discussed different types of cookware and the pros and cons of each one.  We then each talked about what we owned.  I had a set of Farberware non-stick cookware that was long overdue to be replaced.  See:


I mentioned that I was waiting until I had the money to buy a quality set that would last the rest of my life.  Well, that day has arrived!!  Thanks to our tax refund, I was able to purchase a new set.  Thanks to a white sauce with black non-stick flecks in it, I had not regrets about throwing the old set away.

I decided on the Kirkland Signature 13-piece stainless steel set.  It's basically the same set Kimiko discussed back in January.  It does have some style variations from her set and slightly different sizes of pans.  But it has the copper bottoms and all metal construction.


The skillets didn't come with lids, but the saute lid fits the large skillet.


I no longer have to worry about scratching the surface.  I can use any utensil I want!  And they hold heat much better than my old set.

Needless to say, I am very happy with my new toys!!  We cannot emphasize enough how important it is to have quality cookware.  It doesn't have to be expensive; this set cost me less than $200.

Of course, now that I have different cookware, I have to go back and do a little re-organizing.

Saturday, May 21, 2011

Baby Food: Feeding from the Table

April discovered that she can glean from her high chair
if she gets there while I'm busy cleaning up the other
dishes.

April has now really developed great "chewing" skills!  Of course, she doesn't have any chewing teeth, so I guess she's actually developed great "gumming" skills.  Anyway, because she now knows how to mash food between her gums, I can feed her foods with more texture.  And because she's been through all the food types, I can now feed her the same foods we are eating!

There are a few simple guidelines that must be followed when feeding baby from the table:

  • Small bites are a must!  Without teeth, babies only mash food while chewing, not tear it into little pieces like we do.  Don't feed her anything larger than she can/should swallow.
  • Be sure everything is soft enough for their gums to mash.  Try mashing it between your fingers.
  • Continue to watch for allergic reactions.  It is recommended that babies do not consume eggs, peanut products, cow milk, or eggs until they are at least one year old.*  Never feed babies honey during the first year as the spores it contains can make them very ill (see Infants and Honey).
In the past couple of weeks, I have been able to feed April without having to prepare separate meals for her.  She has had black beans and corn, taco meat, white bean and barley soup, taco soup, fried rice, and pancakes and sausage.

She also discovered a treasure trove of
Cheerios under the high chair.

*Regarding the issue of food allergies, there is research on both sides of the argument as to whether or not feeding babies foods too early causes food allergies.  If you have questions or concerns, always talk to your pediatrician.

Friday, May 20, 2011

Corn and Black Bean Salad


On Cinco de Mayo, I decided to make a Mexican feast, so I took to the internet to look for recipes.  I have some Mexican recipes that I like, but I wanted to try something new.  That's when I came across a recipe for a corn and black bean salad.  I served it as a side dish and my 2 1/2-year-old daughter was clever enough to use it as a salsa with chips!  I assume it's pretty tasty with chips, but I just ate it plain.  Also, this recipe (as with most recipes) doesn't require you to follow it to a "T," so get creative and customize it!


Corn and Black Bean Salad
1 1/2 cups black beans
3 cups frozen corn, thawed
6 green onions, chopped
1-2 jalapeno peppers, seeded and minced
1/2 green bell pepper, chopped
1 large avocado, diced
3 tomatoes, seeded and chopped (I used Romas, because they were on sale)
3 Tbsp. lime juice
1/2 cup Italian salad dressing
1/2 tsp garlic salt
1 cup chopped fresh cilantro

Combine all ingredients and mix well.  Chill until ready to serve.  Doesn't get easier than that!

Make sure you use a large enough bowl...this one wasn't big enough!
I transferred everything to this bowl, which worked well.

Wednesday, May 18, 2011

Sautéed Cabbage


Cabbage is one of those vegetables that doesn’t get as much respect as it deserves.  I would guess that the majority of cabbage consumed by the American population is in the form of coleslaw.  Second to that, it’s probably the little bits of purple cabbage that come in ready-to-eat bagged salad.  Of course, I didn’t actually conduct a study, so this is purely my conjecture based on my own experience and observations.

Anyway, I don’t like coleslaw or those purple bits.  In fact, I don’t really like raw cabbage at all.  It’s a texture thing.  Most of the foods I don’t like, it’s because of the texture:  raw cabbage, raw carrots, coconut, invertebrates.  But cook some cabbage, and I love it!

The only other recipe I’ve posted with cabbage was corned beef and cabbage for St. Patrick’s Day.  In that case, the cabbage was slowly simmered/steamed in the slow cooker and took on the flavor of the corned beef.


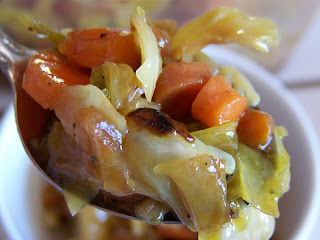
Over the last few months I have taken to sautéing cabbage, sometimes with carrots.  The method is essentially the same as the one I posted about here.  You can also find the nutritional advantages to sautéing in that same post.  The main difference is that I use slightly less heat and let it go longer.  This prevents the cabbage leaves from drying out and burning and also develops some of the sugars.  I also add pepper, which really complements cabbage.

As to the nutritional quality of cabbage, it only has 22 Calories for each cup, chopped (raw).  It is also a good source of fiber and many vitamins and minerals.  You can find the breakdown here.

Even though I already did a sautéed vegetable post, I wanted to revisit it with cabbage.  I have a few recipes that use sautéed cabbage and so thought it deserved its own post.  Be sure to come back for those at a later time.

Sautéed Cabbage
1-2 Tbsp. olive or vegetable oil
1 head cabbage, quartered and cored
3-4 medium carrots, sliced (optional)
Salt and pepper, to taste

Heat oil in large skillet over medium heat.  Slice cabbage quarters into strips.  Turn and chop into bite-sized pieces.


Add cabbage and carrots, if using, to heated oil.


It starts out as a lot...

Season with salt and pepper.  Sauté until tender and slightly golden, about 30 minutes, stirring occasionally.

...but it cooks down a lot.

So yummy!!

Monday, May 16, 2011

Beans and Rice Casserole


A while back, Sumiko wrote about how her family saves money by eating a lot of beans and rice.  We don't eat beans and rice very often (unless there's meat involved), but I did find one meatless recipe that suits my entire family.  I'm hoping to find more, but I can only experiment so much before people start starving!  Anyway, I enjoy this recipe because it's cheap, healthy, low in fat, and high in good protein.  It's also very filling!

Beans and Rice Casserole
1 cup uncooked brown rice
2 cups kidney beans
1 Tbsp olive oil
1 large onion, chopped
14.5 oz can diced tomatoes with chiles
1/4 cup salsa
2 tsp chili powder
1/4 tsp salt
Shredded cheddar cheese, optional
Sour cream or Greek yogurt, optional
Tortillas, optional

Cook rice according to package directions.  I put 1 cup brown rice and 2 1/4 cups water in my rice cooker.  Once the rice is done, transfer it to a bowl and add the kidney beans; mix to combine.


Preheat oven to 350 degrees.

Heat oil in a skillet over medium heat.  Add onions; saute until tender.  Add un-drained tomatoes, salsa, chili powder, and salt.  Cook until heated through.

You don't need the name brand (i.e. Rotel) tomatoes; generic works just fine!


Grease an 8 inch square baking dish (or any 2-qt dish).  Spread one-third of the rice mixture in the bottom of the dish; top with one-third of the tomato mixture.


If you're going to add cheese, put a layer of cheese, followed by another layer of rice and another layer of tomatoes.  Add more cheese, then one more layer of each the rice and tomato mixtures.  I left the cheese out, figuring people could put whatever cheese they wanted on their individual plates.


Cover with foil and bake for 30-35 minutes or until heated through.  Serve as is or with cheese, sour cream, olives, green onions, avocado, hot sauce, tortillas, tortilla chips, etc.  I chose to eat mine with taco sauce, avocado, and Greek yogurt, while my husband chose to turn his into a burrito by putting it into a tortilla with some hot sauce, cheese, and lettuce.

Related Posts with Thumbnails