Showing posts with label Vegan. Show all posts

Friday, June 27, 2014

Sweet Sandwich Bar--Easy Kid-Friendly Lunch!


I have four kids.  Making sandwiches is a chore.  Usually, Lukas and Keanna like peanut butter and jelly, Koda likes peanut butter and honey, April likes just honey.  Then all of a sudden Keanna doesn't want a sandwich, Koda wants just peanut butter, and April wants whatever *insert sibling name here* is having.  They eventually revert back to the usual, but I never know.  During the school year, you eat what Mom packs.  You can make requests, but there are no guarantees.  So I've been trying to mix it up this summer to make lunches more fun.

Last week I had a brilliant epiphany:  a kid-friendly sandwich bar!  I got out a variety of sandwich ingredients and let the kids decide what they wanted.  I then put the ingredients on their plates and let them construct the sandwiches themselves.  They loved it!  Lukas came back for a second sandwich and asked for a third (which I didn't let him have, but he did eat more fruit).

Lukas's plate:  peanut butter, apricot jelly, bananas, apple,
strawberries, and honey.

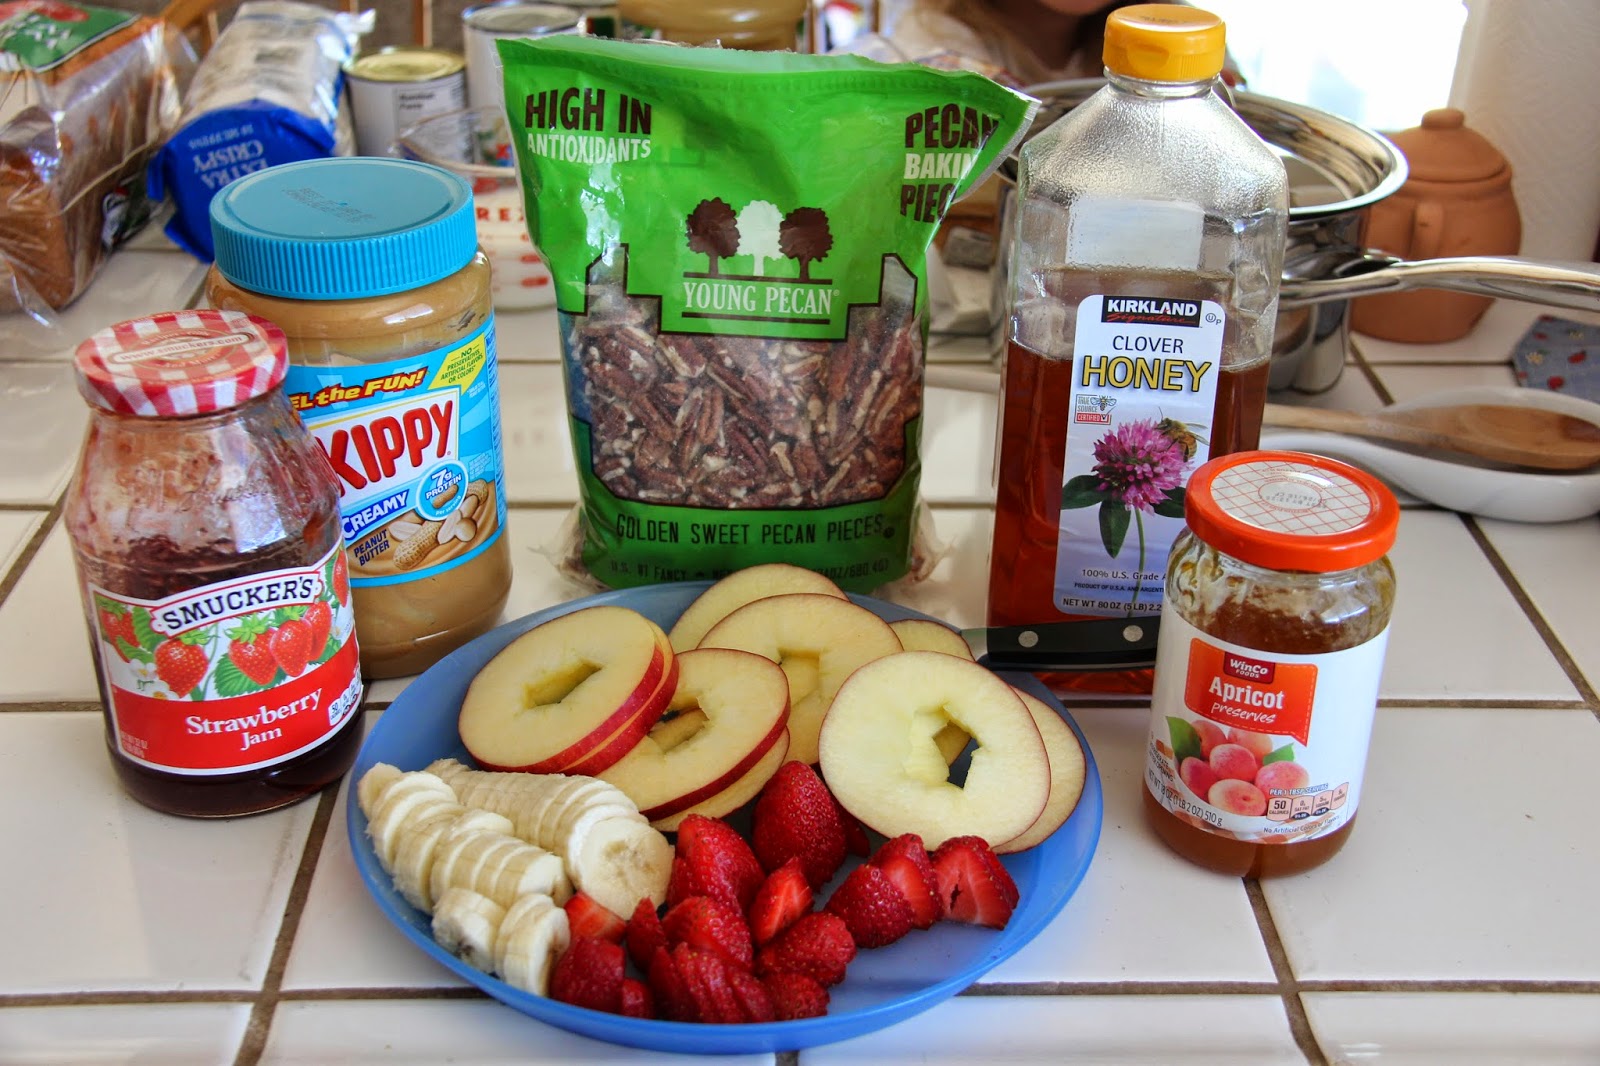
I put out peanut butter, strawberry preserves, apricot preserves, honey, apple slices, banana slices, strawberry slices, and pecans.  That's just what I happened to have that day, but there are many more possibilities:  raisins, dried cranberries, peach slices, cut grapes, granola, maple syrup, blueberries, raspberries, apple butter, pear slices...

Mommy's sandwich:  peanut butter, apple slice,
strawberries, and apricot jelly.  Super yummy!!

Everyone is happy.

Monday, August 6, 2012

Simple Red Beans and Rice


Homemade red beans and rice

Yup!  Beans and rice again!  There are just so many possibilities to feed my family of six for near to nothing.  When this package of red beans and rice mix caught my eye, I just had to give it a try.  Not that I was looking for a great new go-to option, but I just couldn’t believe that a pre-packaged mix could come anywhere close to being as economical or tasty as my homemade version.


The consensus?  I was right.  Not one of us was impressed or even liked the red beans and rice from the mix.  I didn’t make the kids eat it---and that rarely happens in our house.  And the leftovers?  Most of them got tossed.

I added some leftover ham.


The following week, I made my own version of red beans and rice.  There are two ways that I make this dish.  The first, that I’m sharing today, is very simple and frugal.  The second way I make red beans and rice, isn’t as near-to-nothing because it uses some pricey meat.  I will definitely have to share that one in the future.

Ideally, I would use one red pepper and one green pepper.  When I made this to take pictures, I used two red because they were on sale.  I was also out of onions, so I just did without.


The recipe includes hot sauce as optional.  I usually don’t put any in the pot because of the kids, but Robbie and I add it to our individual bowls.  If you do not include the hot sauce, you may want to add a little more salt.

Of course, when I make red beans and rice, I end up with a ton.  We ate them for dinner, froze some for another dinner, and refrigerated some for lunch.

Simple Red Beans and Rice
2 bell peppers (any color)
1 onion
1-2 Tbsp. vegetable oil
2 qts. water
2 c. brown rice
2½ c. cooked red beans
Chopped or diced cooked ham or sausage (optional)
1 Tbsp. garlic powder
4 Tbsp. chicken or vegetable bouillon
1½ heaping Tbsp. paprika
½ tsp. pepper
1½ tsp. salt (more or less to taste)
Hot sauce (optional)

Dice peppers and onion.  Heat oil in large Dutch oven or stock pot.  Add peppers and onion to oil; sauté until soft and onions are slightly translucent.  Add all remaining ingredients.  Bring to boil; cover, reduce heat, and simmer until rice is done, about 40 minutes, stirring occasionally.


When rice is done, leave at a simmer and use immersion blender or back of spoon to smash some of the beans until desired consistency is reached, adding water as necessary.

I used a spoon to smash some of the beans against the pot
because my immersion blender died.

Soup will continue to thicken a bit as it sits.  Adjust seasonings as desired.  Yield:  lots!  (probably about 4 qts.)  Total cost without meat:  less than $6.

It even just looks better than the packaged version.

Saturday, June 9, 2012

Cherry Pie


No cook cherry pie

A couple weeks ago, a friend of ours stopped by with a ton of cherries from her cherry tree.  I never buy cherries because they are always over $2 per pound so it was a treat!  They were delicious just for eating, but I couldn’t pass up the opportunity to bake something delicious.  I ended up with some mini cherry pies and a cherry crumble!  Yum!

Aren't they pretty?

I opted to make three little pies rather than one big pie to conserve the cherries and have fun with different top crusts.  The recipe is for a regular 9-inch pie.  And the best part?  You don’t have to cook the filling first!!


Keep in mind that the amount of sugar will vary depending on the type of cherries you are using.  I’m not sure what type of cherries I had.  They were sweet enough to eat, but not super sweet.  If using sour cherries, you’ll want more sugar; if using super sweet cherries, back off on the sugar.

For the pie crust, I used my tender and flaky pie crust recipe.

Tender and flaky pie crust with strawberry filling.

Cherry Pie
3 lb. pitted cherries
2 c. sugar (more or less depending on type of cherries)
4-4½ Tbsp. cornstarch
3 Tbsp. water
1½ Tbsp. lemon juice
½ Tbsp. almond extract
⅜ tsp. salt
1 batch tender and flaky pie crust
3 Tbsp. butter, diced

In large bowl, combine all ingredients except crust; stir to combine.  Let sit about 15 minutes, stirring occasionally.

Notice the graininess of the sugar on the cherries.

Meanwhile, preheat oven to 425°.  Roll out bottom crust and place in pie plate.  Pour filling into crust; dot with butter.

The graininess goes away as they sit and even
more as the pie bakes.

Roll out top crust and seal over filling.  Cut steam vents in crust.  Place pie plate in oven on a piece of foil to catch any drippings; bake 30 minutes.


Reduce oven to 350° and continue to bake 25-35 minutes, or until crust is golden and filling bubbles out.  If crust browns too quickly, loosely cover with a piece of foil until filling is done.  Cool on wire rack.

This is why you need the foil---that goo would have
been burned to the bottom of my oven.


So delicious!

Be sure to check back next week for cherry crumbles!!

Friday, January 27, 2012

Roasted Brussels Sprouts


Brussels sprouts are one of the most misunderstood vegetables out there.  They've gotten a pretty bad rap, but I'm out to try to fix that.  I love Brussels sprouts and so does my 3-year-old daughter.  My suspicion as to why people don't like them is because they've never had them prepared in a way that makes them shine! The key to a good Brussels sprout is to roast it.  Sumiko wrote about roasting vegetables a while back, but I want to revisit it, since Brussels sprouts are in season and I've been finding them on sale (88 cents/lb)!  Next time you see them on sale, buy a few and give 'em a try!

My 3-year-old waiting for the Brussels sprouts to roast.  

Roasted Brussels Sprouts
Brussels sprouts, cleaned and outer leaves removed
Olive oil
Salt
Pepper

Preheat oven to 400 degrees.

Spread Brussels sprouts out on a pan with sides.  Drizzle with olive oil and sprinkle with salt and pepper to taste.  Place pan in preheated oven and roast for 20-35 minutes (depending on size), or until tender in the center.  Several times throughout the roasting time, shake the pan around a little bit.  

Eat and enjoy!

Seasoned and ready to go into the oven!

These aren't burnt!  You want the bits of brown on these.

A poor, misunderstood Brussels sprout.

Wednesday, December 7, 2011

Mixed Bean Soup


In case you haven’t noticed, let me just tell you that I love cooking dried beans.  They’re cheap, easy, nutritious, versatile, delicious, and have a long shelf life.  Of course, I buy all mine from the bulk bins at WinCo.

I use whatever I have in my pantry.  This time it was pintos
small red beans, small white beans, kidney beans, lentils,
green split peas, and black beans.

The thing that I find ridiculous is that you can buy bean soup mixes for a lot more than it would cost you to buy the beans yourself.  All they do is mix them for you.  WinCo even has a 13 bean mix in the bulk bins.  It is actually reasonably priced at about $1.22/lb.  But I don’t pay near that for any of the beans I buy.  Take the same bean mix, bag it, and put it in a Harry & David store, and it’ll cost you over $5/lb!

So pretty!

One of the easiest things to make with beans is bean soup.  While I often cook beans in the slow cooker, I prefer to make bean soup on the stove.  This way I can cook the beans and then add and cook the veggies without having to dirty extra dishes.

In the directions below, I quick soak the beans.  In lieu of this, you can soak them overnight and go right to cooking them.

There are two ways you can get a complete protein out of this soup.  The first (and cheapest) way is to serve it with or over rice.  The second way is to add meat to it.  Ham, bacon, or sausage would make a great addition.  The last time I made this soup, I served it with bacon that I had found on sale a while ago and stored in my freezer.  But of course, I try to stretch meat as much as possible.  So rather than mixing it into the soup, I chopped it up and served it as a garnish sprinkled on top.  Not only does this provide great protein and flavor, but the crispiness of the bacon adds great texture contrast.

Of course, this recipe makes a lot.  I like to make a big batch and freeze some of it.  You can easily halve the recipe.

To make this vegan, simply substitute vegetable bouillon for the chicken bouillon and don't garnish with sour cream or bacon.

Mixed Bean Soup
2 lb. (about 5½ c.) beans, rinsed
4 qts. water
2 carrots, chopped
2 ribs celery, chopped
½ c. chicken bouillon
Salt, to taste
Pepper, to taste
Sour cream or yogurt (optional)
Bacon, cooked and diced (optional)

Place beans and water in large stock pot.  Bring to boil and boil 10 minutes.  Turn off heat; let sit, covered, for 1 hour.  Return to boil, reduce heat and simmer about 1 ½ hours.  Add carrots, celery, and bouillon.  


Bring to boil again; reduce heat and simmer until vegetables are tender.  To thicken the soup, smash some of the beans against the side of the pot with a wooden spoon until desired consistency is reached.

Consistency before smashing beans...

Season with salt and pepper.  Serve with sour cream or yogurt and bacon.

...thicker consistency after beans have been smashed.

Friday, November 18, 2011

Cranberry-Orange Relish


Before Kimiko and I were married, with families of our own, we spent every Thanksgiving with Doris, our Near to Nothing grandma’s cousin.  Now that we try to split our holidays with in-laws, unfortunately we only get to spend about every other Thanksgiving with her.  Yes, our great grandmother still has living cousins!

One of Doris’s specialties is cranberry-orange relish.  I am generally not a cranberry person, so I usually pass on the relish.  But everyone else always raves about it!  And I can tell you, it definitely looks a lot better than that can-shaped gelatin stuff.

As I was making this the other day, the boys were watching me and tasting ingredients.  To my surprise they really liked the fresh cranberries by themselves.  When it came time to try the finished product, they were both very hesitant, almost refusing.  But as soon as the first little morsel hit their tongues, their mouths turned up in huge smiles, and they gulped down the rest of the spoonful.

The key (and benefit) to this recipe is that it should be made the day before.  Not only does the resting time let the flavors meld together and mellow out, but who doesn’t appreciate a make-ahead Thanksgiving dish?  I made mine on Monday—that’s a week-and-a-half before Thanksgiving.  No problem!  I just tossed it into the freezer and will put it back in the fridge a day or two before the big feast.


Cranberry-Orange Relish
2 oranges, peeled, seeded, and quartered
1-12 oz. pkg. cranberries
1 c. crushed or chunk pineapple, drained
2 c. sugar

Place orange pieces, cranberries, and pineapple if using chunks in food processor.  Pulse until chopped to desired texture.


Transfer to bowl.  Stir in crushed pineapple if using and sugar.


Refrigerate overnight.  Yield:  about 5 cups.

There will be a lot of air bubbles in the freshly chopped
and stirred relish.  A night in the fridge will transform
the foamy mixture into...
...a colorful, appetizing turkey accompaniment.

Monday, September 19, 2011

End of Summer Zucchini and Tomatoes


Autumn starts this week!  I am more excited about the coming of the fall season than I have ever been--pumpkin bread, crisp air, hearty chili, sweaters, crunchy leaves!!  I love it!

But, alas, the coming of fall also means the end of the summer harvest.  I am using up the last of my tomatoes and zucchini and will soon have to resort to buying those red baseballs at the store that they label as tomatoes.  While I am sad that there will be no more garden-fresh veggies for a while, I can say I am ready to be done processing tomatoes.  All that blanching, peeling, cooking, chopping, and pureeing is very taxing, especially when you have four kids vying for your attention.

With all that said, I am now resorting to easy ways to use up the last of the harvest.  And I have to say, this is one of my favorite that I've come up with so far.  The key is to turn the heat off before adding the tomatoes so they don't cook, but just heat.  Mmmm!!  So juicy and fresh!

End of Summer Zucchini and Tomatoes
1-2 Tbsp. olive or vegetable oil
1 large zucchini
Salt, to taste
Pepper, to taste
Garlic powder, to taste
about 1/4 c. balsamic vinegar
about 4 large tomatoes

That's a BIG zucchini!

Heat skillet over medium-high heat.  Add oil.  Meanwhile, cut zucchini into bite-sized pieces.


Add to skillet and season to taste with salt, pepper, and garlic powder.  Cook, stirring occasionally until zucchini is almost done.


Meanwhile, cut tomatoes into wedges.  A few minutes before zucchini is desired tenderness, add balsamic vinegar and continue to cook until just about done.  Turn off heat and add tomatoes.  Gently toss to heat tomatoes.


Turn gently to keep tomatoes intact.

Tomatoes are heated but not cooked--perfect!

Monday, August 15, 2011

Summer Harvest Pasta (Pasta with Zucchini and Tomatoes)


As I mentioned last week, my neighbor Jerry has been giving me tomatoes from his garden.  He has also been giving me zucchini!  So far I’ve made zucchini bread, zucchini fries, sautéed zucchini with tomatoes and balsamic vinegar, zucchini brownies, and pasta with zucchini and tomatoes and I still have a few more zucchini dishes I want to make.


Today I’d like to share the pasta with you.  The quantities I give for the ingredients are all approximate as I was using mostly fresh produce and didn’t bother weighing or measuring any of it.  But that’s one of the great things about pasta—it’s not an exact science.  And I don’t know how much pasta I added to the sauce.  Because my kids don’t like zucchini, I made a bunch of pasta but only put some of it into the sauce.  While Robbie and I ate fresh harvest pasta, they had noodles with spaghetti sauce from a jar.

A lot of advanced-skilled cooks would probably skin the tomatoes before adding them.  Too much time and effort for this point in my life so the skins stay on.


I would also add more salt and pepper when making this for Robbie and myself, but went more conservative for those who don’t like as much salt and pepper.  Just taste and adjust as necessary.

Summer Harvest Pasta (Pasta with Zucchini and Tomatoes)
About ¾ lb. spaghetti or fettuccine, preferably whole wheat
1-2 Tbsp. olive oil
1 large onion, diced
5 cloves garlic, minced
5-6 medium tomatoes, cut in wedges or 30 oz. canned diced tomatoes
1-2 tsp. salt plus more
½ tsp. pepper plus more
½ tsp. oregano
Small bunch fresh basil leaves, torn or ½ tsp. dried
1 large zucchini, cut into large chunks
Parmesan cheese (optional)

Boil pasta according to package directions.  Meanwhile, heat skillet over medium-high heat; add oil.  When oil is hot, add onion and sauté until translucent.

From this...

...to this!

Add garlic, 1-2 tsp. salt, and ½ tsp. pepper; sauté until fragrant.  Stir in tomatoes, oregano, and basil.


Continue to cook until fresh tomatoes are cooked down and heated through.  Stir in zucchini and continue to cook until desired tenderness.


Add additional salt and pepper as desired.  Stir in hot, drained pasta.


A rogue corkskrew snuck in there!

Serve with Parmesan cheese if desired.


Related Posts with Thumbnails