Showing posts with label Candy. Show all posts

Sunday, February 12, 2012

Homemade Marshmallows (plus a Valentine's breakfast idea)


I'm not a fan of marshmallows.  Well, that is unless they're melted and inside of a s'more...but only if the s'more's made with dark chocolate.  Ok, so I'm realizing I'm a bit of a chocolate snob, but really, dark is the only kind of chocolate that's worth eating.  Anyway, as I was saying, I'm not a fan of marshmallows.  That is, until I discovered homemade marshmallows.  Mmmm...these things take marshmallows to a whole new level.  They're not dry and hard like the store-bought variety.  It's really hard to describe; you'll just have to try them for yourself!  I have to thank Alton Brown for this recipe (and you'll want to thank him too after you try these!).

As I was brainstorming what I could give my neighbors for Valentine's Day this year, homemade marshmallows came to mind.  I like to do something different than the typical cookie when I have the time. Anyway, I was thinking it might be strange to just give marshmallows, so I was trying to think of a way to make it work.  Then it hit me.  I could make pink marshmallows, cut them into heart shapes, and give them with hot chocolate mix!  If I had a little extra time to plan, I would have gone in search of some cheap Valentine's mugs to put the marshmallows and hot chocolate mix in, but I didn't, so I had to make what I had work.

Marshmallows
3 packages unflavored gelatin
1 cup ice cold water, divided
12 oz granulated sugar (this was just over 1 1/2 cups for me)
1 cup light corn syrup
1/4 tsp kosher salt
1 tsp vanilla extract
1/4 cup powdered sugar
1/4 cup corn starch
Nonstick spray

In the bowl of a mixer fitted with the wisk attachment, add the gelatin and 1/2 cup of the cold water.  Set aside.


The gelatin and cold water after it had ben sitting for a couple minutes.

In a small saucepan over medium-high heat, combine granulated sugar, corn syrup, and salt.  Cover and let cook for 4 to 5 minutes.  Remove lid and continue cooking, without stirring, until it reaches 240 degrees.  Once it reaches this temperature, immediately remove it from the heat.


Turn the mixer on low and slowly pour the sugar mixture down the side of the bowl into the gelatin mixture.  Once all of the sugar mixture has been added, increase the speed to high and beat until the mixture is thick and lukewarm, about 12-15 minutes.  Add vanilla during the last minute of whipping.  For my special Valentine's treats, also add red food coloring during this time.


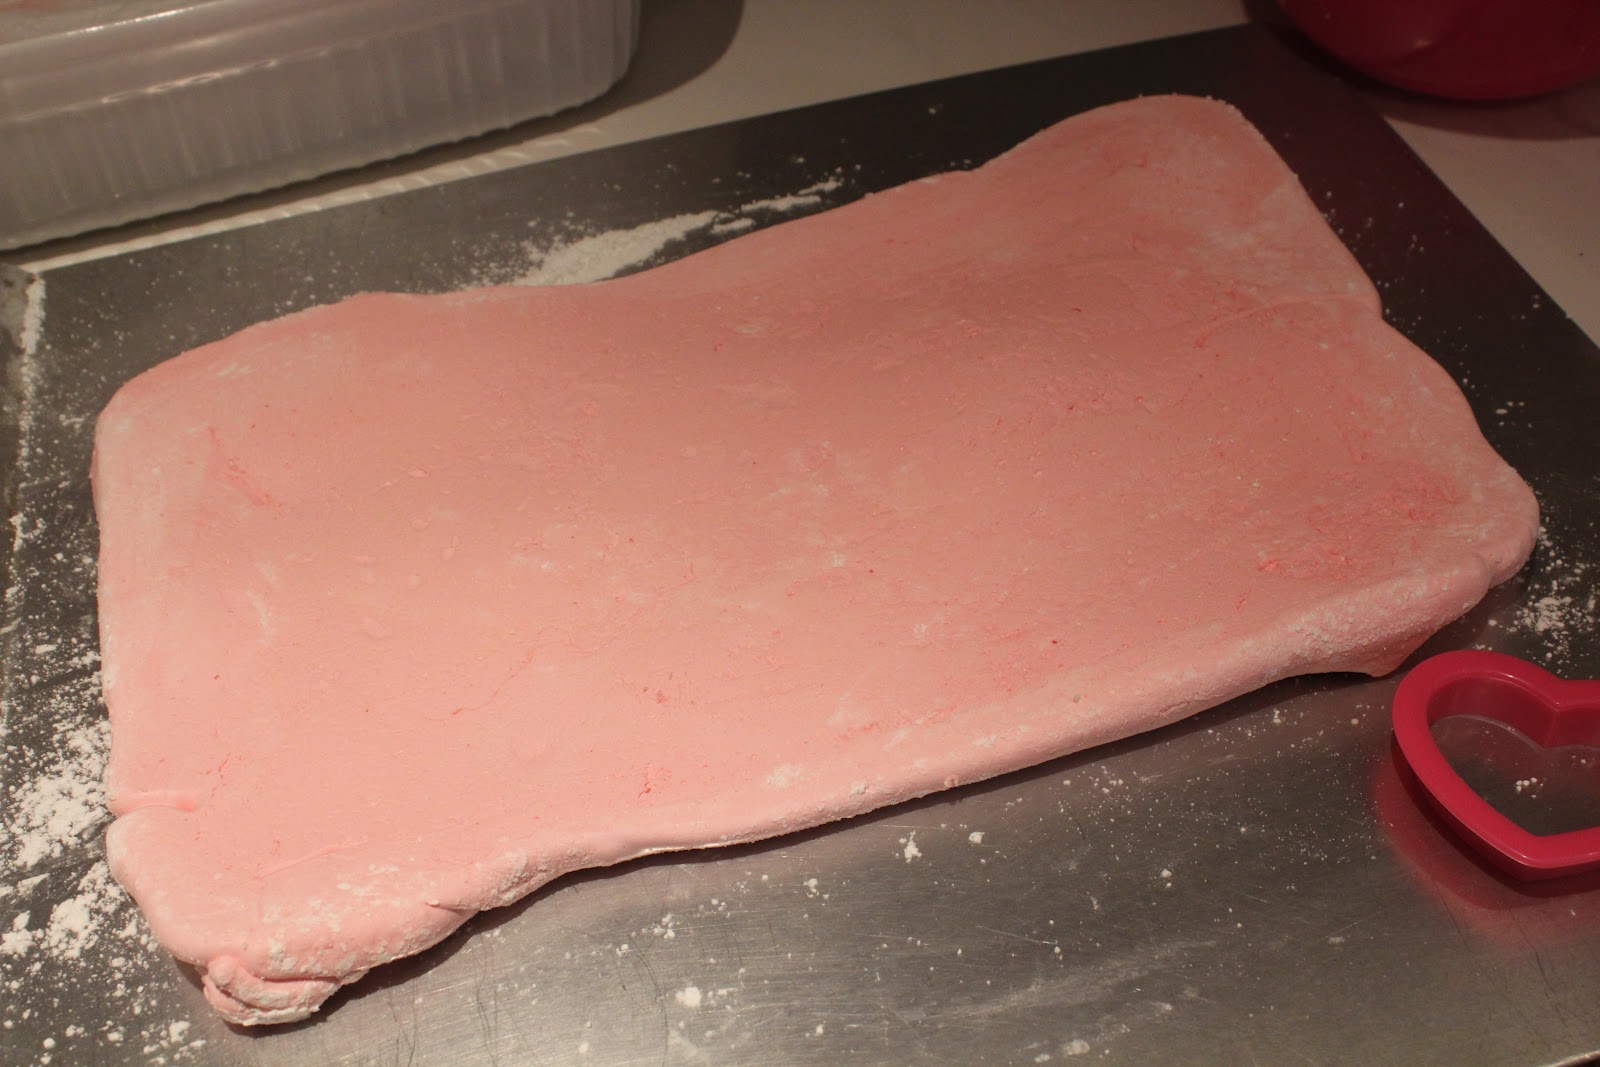
While the mixture is whipping, prepare your pan.  Take a metal 9 x 13 pan and spray it with nonstick spray.  Mix powdered sugar and corn starch; put some into the greased pan.  Shake the pan around to coat the bottom and sides with the powdered sugar mixture.  Return the excess powdered sugar to the bowl for later use.  I ended up using two pans because my heart cookie cutter was bigger than I would have liked it to be.  However, I figured it would still work but because my cookie cutter was on the bigger side, I didn't want them to be too thick.  Hence I divided mine between two pans.


Pour marshmallow mixture in prepared pan(s).  Use some self control and try not to eat all of the marshmallow creme now.  Use a well-oiled rubber spatula to spread it evenly in your pan(s).  Dust the top of the marshmallows with your powdered sugar mixture.  Allow to sit, uncovered, for at least 4 hours or up to overnight.  Turn marshmallows out onto a cookie sheet.  You may need to use your hands to help pull them out of the pan.

For regular marshmallows, dust a pizza cutter with your powdered sugar mixture and cut into 1-inch marshmallows.  For the Valentine's Day marshmallows, take a heart cookie cutter (not too big if you want it to fit into a mug with hot chocolate), dust it with the powdered sugar mixture, and cut out the hearts.  When the hearts (or regular marshmallow cubes) have been cut out, make sure all sides are coated with your powdered sugar mixture so that they don't stick together.  You can store these in an airtight container for up to three weeks.  For instructions on how to make miniature marshmallows, click here.

Ready to sit for at least 4 hours. (sorry for the lack of white balance on this photo)


The gifts we took to our neighbors.

For extra yummy marshmallows, you can dip them in melted chocolate.  Yum!  I've even been known to dip them in chocolate, then roll them in graham crackers for a sort of s'mores marshmallow.

And if you're in need of a Valentine's breakfast idea, here's a pretty simple one.  In October, Sumiko wrote about eggs in a hole and talked about making fun shapes for the hole.  This is such an easy breakfast to make on Valentine's Day by using a heart shaped cookie cutter!  Also, in order to make the shape a little more distinguishable (Sumiko outlined hers in ketchup), I first cut out the heart, buttered both sides of the outer part of the bread and toasted one side in my frying pan.  Once it was nicely toasted, I flipped it over, then added the egg and broke the yolk.  Once the egg was cooked well on that side, instead of flipping it over, I stuck it in a preheated 350 degree oven and left it in there until the egg was cooked through.  Easy peasy!

Friday, October 28, 2011

Chocolate Covered Caramel Corn


I apologize for another sweet post, but Monday is Halloween, so this is the last chance to get this in before Halloween.  It's not necessarily a Halloween recipe, but it can be good for all of fall...or all year long, actually.  It's different than the chocolate-caramel corn recipe I posted a while back.  Instead of popcorn coated in chocolate caramel, this is caramel corn drizzled with chocolate.  How can you go wrong with popcorn, caramel, and chocolate?!

The recipe calls for 12 cups of popped popcorn.  There are several ways you can make the popcorn.  The first is in a good, old-fashioned air popper.  You can also use a microwavable popcorn popper.  Actually, though, you don't need any sort of special equipment.  There are two ways of making microwavable popcorn with things that you probably already have on hand.  One is the paper bag method Sumiko wrote about last year.  Another way is to put a tablespoon or two of kernels in the bottom of a Pyrex mixing bowl, cover it with a plate or a microwave cover, and microwave until most of the kernels are popped.  If you use this method, be careful when getting the bowl out of the microwave - it will be hot!!


A simple microwavable popcorn popper!

Pop!

Chocolate Covered Caramel Corn
12 cups popped popcorn
1 stick butter
1 cup packed brown sugar
1/4 cup corn syrup
1/2 tsp salt
1/4 tsp baking soda
1/2 tsp vanilla
Chocolate chips (I used dark chocolate)
White chocolate chips (optional)
Shortening
Food coloring (optional)

Butter the bottom and sides of a jelly roll pan and set aside.  Place popcorn in a large mixing bowl; set aside.  If you're feeling nutty, mix some peanuts or almonds in with the popcorn.  Sorry for the (pop)corny pun!

Preheat oven to 250 degrees.

In a medium saucepan, melt butter over medium heat.  Add brown sugar, corn syrup, and salt.  Stir constantly until mixture boils.  Let it boil for 5 minutes without stirring.  If you stir it, you may end up with crystallization (i.e. grainy caramel).  So resist the urge and just let it be!


After 5 minutes, remove from heat and carefully stir in the baking soda and vanilla.  There will be a reaction and it may spray out a little bit, so be careful (trust me, having hot caramel splashed onto your skin is no fun)!  Pour the caramel over the popcorn and stir to combine.  Turn caramel corn out onto prepared pan and spread it evenly over the pan.  Bake the caramel corn for 1 hour, stirring ever 15 minutes.  Remove from the oven, cool completely, and break it apart.


Melt chocolate chips.  Drizzle as much or as little as you'd like over the caramel corn.  Allow to harden.  If you want each piece to have a lot of chocolate on it, wait for the chocolate to harden, break it apart and mix the caramel corn, and drizzle more chocolate on it.  If desired, melt some white chocolate with shortening, then add food coloring.  Drizzle over the chocolate covered caramel corn; allow to cool and harden.


If you're looking for some savory Halloween recipes, check out Sumiko's slime soup and pumpkin pizza from last year!  She didn't post the pumpkin pizza recipe, but it's basically regular pizza made in the shape of a pumpkin with creatively placed toppings.

Wednesday, October 26, 2011

Caramel Apples!!


You can tell autumn is coming when the price of apples starts to drop.  Though they won’t hit their lowest prices until winter, you can still find some great sale prices.  Of course, you would want to eat most of those delicious apples plain—that’s how they’re healthiest.  But it is okay to sweeten them up a bit every now and then.

With Halloween right around the corner, I thought it would be fun to make caramel apples with orange coating.  I think this is what my neighbors are going to be getting in their trick-or-treat bags, at least the neighbors I know personally.  I really wish our society was such that I could hand out homemade candy to everyone.

Anyway, there are a few ways to go about making caramel apples.  The most common (and fastest) way is to buy caramels at the store and melt them down with some milk.  If you’re interested in making caramel apples this way, you can find Paula Deen’s recipe here.  I can’t vouch for it, though to make sure you get it right, be sure to read the recipe and directions with a Southern drawl.

The way I choose to make caramel apples is from scratch.  Caramel is basically a lot of sugar, a lot of fat, and a little flavoring.  The ingredients are simple, but combined and cooked properly, the result is decadently delicious.

The key to making successful caramel is to cook it to the correct temperature.  Basically, the higher the temperature the sugar reaches, the thicker or harder it will be once it cools to room temperature.  To successfully coat apples, the ingredients must reach 244° but not go over 246°.  Because accuracy is essential, be sure to use a thermometer.  You can buy a candy thermometer which clips to the side of your pot.  I use my probe thermometer so it will alert me when the correct temperature is reached.  Regardless of what type of thermometer you use, be sure it is not resting on the bottom or against the side of the pot.

To keep my probe off the bottom of the the pot, I
hang the wire over my cupboard knob.


When choosing a pot, pick one that is a lot bigger than you think you need.  The sugar will bubble up as it cooks.  I use a three-quart pot for the recipe below.


For sticks, I use the wooden dowels that I use to stack tiered cakes.  They are made by Wilton and are available at Michael’s.  I just use pruning sheers to cut them to the desired length.


Caramel Apples
6 medium apples, stems removed
6 wooden dowels
1 c. sugar
1 c. dark corn syrup
½ c. (1 stick) butter
1 c. cream
¼ tsp. salt
1 tsp. vanilla
Nuts, chopped (optional)
Chocolate, melted (optional)
White chocolate, melted (optional)


Line a jelly roll pan with parchment.  Wash and dry apples.  Insert dowel in each apple and place on jelly roll pan.  Store apples in refrigerator until ready.


Place sugar, corn syrup, butter, cream, salt, and vanilla in large pot.  Cook over medium-high heat until caramel reaches 244°-246°.  There is no need to stir, just let it go.


Once the target temperature is reached, turn off the heat and let caramel cool to about 220°.  Twirl apples in caramel and place on pan.


Roll in chopped nuts if desired.  Place in fridge to cool caramel quickly.  If adding chocolate, place melted chocolate in piping bag or zip-top bag with corner cut off.  Drizzle over apple while turning.

Sorry there's no photo of the process.  I just can't turn the
apple, pipe the chocolate, and take a picture at the same time.

Be creative with your drizzle!

Place in fridge to harden.  Store caramel apples in refrigerator.  Remove from fridge about 1 hour before eating.

I added orange gel coloring to white chocolate to make
these apples more festive.

Wednesday, March 30, 2011

Jill's Honey Milk Balls


I love bees!!  They are my favorite insects.  I’m guessing most people do not share my affection for these amazing creatures—I know Kimiko doesn’t.  But I think they are intriguing.  Not only are they beautiful, but they pollinate our crops and provide us with honey.  Someday I would like to have a hive in our backyard.

I’m not sure exactly where I got my fondness for bees, but it’s possible that it came from visiting my mom’s Uncle Stu when I was a kid.  He has been a beekeeper in Pennsylvania for 46 years.  He sells his honey under the name Honey Crest Farms.  I remember looking at his hives as a little girl.

A few summers ago, Robbie, Keanna, and I took a trip to Pennsylvania to visit my grandparents.  While there, we had the opportunity to spend an afternoon with Uncle Stu and his bees.  He even let us cut open some honeycomb!!

Honey itself is an amazing food.  Its color and flavor vary drastically depending on the nectar from which it is made.  Probably one of its most impressive qualities is that you can store it a very long time.  As long as it is stored in a sealed container, it will keep indefinitely.  Bacteria cannot thrive in honey, therefore it will never go bad.

The one problem with storing honey for a long time is crystallization.  Over time, the sugars will crystallize, forming a solid mass.  This is easily reversed with a little heat.  About four years ago, Robbie’s mom gave me a one-gallon(!) tub of honey from her relatives in Montana.  That’s a lot of honey!!  I am still using it.  It crystallized a long time ago.  I simply scoop some of the honey into a jar and pop it in the microwave to liquefy it.  We usually use the honey in the jar before it re-crystallizes; but if not, I just stick it back in the microwave.  If you have crystallized honey in a plastic container, you can use a hot water bath to liquefy it.

That's A LOT of honey!  I think it started out at about
12 pounds!

Don't throw away crystallized honey!!

From this...

...to this.  Just watch it carefully as it can and will boil over.
Also, use extreme caution--it will get hot!

One of my favorite things to make with honey is honey milk balls.  I got this recipe from Uncle Stu’s daughter, Jill.  She was the Pennsylvania Honey Queen in 1988, and is now the VP of Sales and Marketing for Dutch Gold Honey.  Her original recipe calls for coating them in 6 blocks of unsweetened chocolate melted with 1 Tbsp. butter, ½ block of wax, and 1 tsp. vanilla.  I really like dark chocolate, so I tweaked that part of the recipe.

Jill’s Honey Milk Balls
½ c. honey
½ c. creamy peanut butter
1 c. nonfat dry milk
1 c. quick oats
10 oz. dark chocolate, chopped or chips
1 Tbsp. vegetable shortening (do NOT use vegetable oil)


Combine honey and peanut butter.


In a separate bowl, combine dry milk and oats.  Work dry ingredients into gooey ingredients.


Refrigerate until cool.  Meanwhile, place chocolate and shortening in microwave-safe bowl.  Microwave 45 seconds; stir.  Continue to microwave in 30-second intervals, stirring thoroughly between heating times until smooth.


Line a rimmed baking sheet with wax or parchment paper.  Roll cooled mixture into small balls.  Dip cool honey balls into chocolate and place on baking sheet to harden.  If mixture gets tacky, stick it back into the refrigerator to cool before continuing.  Likewise, as chocolate cools, return it to the microwave for 10-15 seconds to warm up.

Candy-dipping tools are great if you make a lot of candy.
Otherwise, a fork will do the job just fine.

Toss a few in and turn to coat.

Let excess chocolate drip back into bowl.


A fork will do the same job, but doesn't let as much excess
chocolate drip off.  Maybe that's a good thing?

As I discussed in my peppermint bark post, I don't temper
chocolate, so it develops bloom.  Doesn't affect the flavor,
just doesn't look as pretty....

....But who cares if it doesn't look perfect when it tastes
so good?!?

For more information, tips, and recipes using honey, see the American Honey Board website.  If you are interested in beekeeping, see the American Beekeeping Federation.

*Note:  You may have noticed that I used Alton Brown’s plunger measuring cup for the peanut butter and honey.  This is similar to the Pampered Chef mini measure-all cup we’re giving away tomorrow!!  If you haven’t already entered the giveaway, you can find all the details here.


Related Posts with Thumbnails