Monday, April 30, 2012

BBQ Chicken Sandwiches from Leftovers (and an encouragement to check the clearance section)

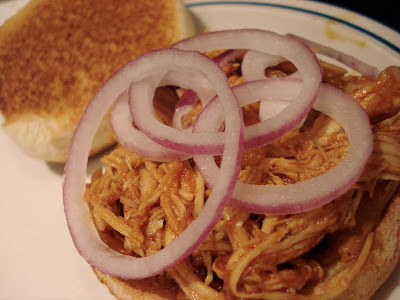
BBQ chicken sandwiches

A while back, I posted a recipe for slow cooker BBQ chicken sandwiches.  However, I haven't actually made those in quite a while, because I've found another way to make them.  Whenever whole chickens go on sale for under 80 cents/lb, I almost always buy one to cook in the slow cooker.  There are several things I like to make with the chicken and I'm usually able to get at least 3 meals out of each one, which makes for really inexpensive meals.  In fact, last week I went to get a chicken since they were on sale for 79 cents/lb.  But, before I buy meat, I always check the meat clearance section just in case they might have what I'm looking for (or maybe even something I'm not looking for, but that I know we'll use and I can freeze).  Well, it just so happened that they had one chicken in their clearance section for 50% off, meaning I paid less than 40 cents/lb for the chicken!  What a great deal!  So, next time you have a whole chicken or leftover chicken, consider making BBQ chicken sandwiches!

BBQ Chicken Sandwiches using Leftover Chicken
1/2 onion, chopped
Vegetable oil
Shredded, cooked chicken
BBQ sauce (I used bottled)
Hamburger buns

In a skillet, heat oil over medium to medium-high heat.  Add onions and saute until soft.  Add chicken and BBQ sauce.  Cook until heated through.


Leftover chicken


Toast buns, if desired, and place chicken on buns; serve.

It doesn't get easier than that, does it?

And in case you're looking for ideas to use a whole chicken, here are some we've posted in the past.  Just make sure you plan two or three of these at a time, so you get the most out of your chicken!


Friday, April 27, 2012

Bean and Rice Enchilada Casserole


Meatless bean and rice enchilada casserole
Sorry, forgot to take a pic of the baked casserole.  Imagine this browned
with melty cheese on top and steam rising from the surface.


Cinco de Mayo is approaching!  I love Cinco de Mayo because it is just another excuse to make Mexican food.  Not that I need one---I actually cook a lot of Mexican.  But it’s a fun excuse to try new things.  I’m hoping to try a new Mexican beef stew this year.  And I want to make chimichangas.  Yum!

Since I have Mexican food on the mind, I decided to try a new variation on my enchilada casserole.  I wanted to make a meatless version that doesn’t require a lot of cheese.  So earlier this week, I cooked a pot of pintos and white beans, make a pot of brown rice, and threw together this bean and rice enchilada casserole.

It turned out really good!  Even though it doesn’t have any meat in it, it is still very substantial.  And it still provides a complete protein.  Additionally, the beans and brown rice add a lot of fiber that would be missing from more traditional meat or cheese enchiladas.

Bean and Rice Enchilada Casserole
1 large can enchilada sauce (or homemade)
Corn tortillas
1 qt. beans, drained (pintos, white beans, black beans, and/or kidney beans)
3 c. cooked brown rice
1 lb. frozen corn
6 oz. cheddar cheese, shredded


Preheat oven to 350°.  In 9X13” pan, spoon a thin layer of enchilada sauce to cover bottom.  Place single layer of tortillas over sauce.


Spoon ½ of the beans over tortillas, followed by ½ of the rice, ½ of the corn, and 1/3 of the cheese.  Pour 1/3 of the remaining sauce over all and cover with single layer of tortillas.


Repeat:  remaining beans, remaining rice, remaining corn, ½ of remaining cheese, ½ of remaining sauce, single layer of tortillas.  Top tortillas with remaining sauce, spreading to cover.  Sprinkle with remaining cheese.

I ran out of corn tortillas so I used flour to finish covering
the top.  No one even noticed!


Cover with foil, tenting as necessary.  Bake about one hour.

Wednesday, April 25, 2012

Green Salad with Strawberries and Strawberry Vinaigrette

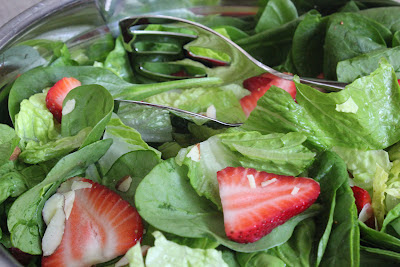
Green salad with strawberries and strawberry vinaigrette

At the end of January, I joined a 12-week weight loss competition.  Well, I didn't really compete; I just joined the group for the motivation and support.  Anyway, our 12 weeks ended Sunday, and to celebrate, we had a pot luck!  I never know what to take to pot lucks to begin with, but when it's with people who have just finished 12 weeks of losing weight, it's even more difficult deciding what to take.  Just because the competition's over doesn't mean anyone should start eating a bunch of junk - that would be counter-productive to what we've just accomplished.  So, after racking my brain, I decided a salad would be the safe bet.  As I thought about different salads I could take, my brain went to strawberries (which just happen to be on sale for 99 cents/lb this week).  At a work pot luck, one of my coworkers had once brought a delicious green salad with strawberries!  So I scoured the internet for recipes and settled on this one by Rachel Ray.  Of course, I did make a few slight alterations!  I apologize for the lack of pictures, but this is a pretty simple recipe.

Green Salad with Strawberries and Strawberry Balsamic Vinaigrette
Green lettuce (any type will do, but I used a mixture of Romaine and spinach)
Sliced almonds
Strawberries, sliced
Strawberry Balsamic Vinaigrette (recipe below)

Combine all ingredients and toss.  Serve immediately.  Note: this would probably be good with some feta added, but I didn't have any on hand.


Strawberry Balsamic Vinaigrette
3 Tbsp olive oil
1 Tbsp balsamic vinegar
3-4 tsp strawberries jam or preserves
Salt and pepper to taste

Combine olive oil, vinegar, and jam.  Combine well; add salt and pepper to taste.  I made a large salad, so I doubled the dressing and had just a little extra.

Monday, April 23, 2012

Cake Series: Swiss Meringue Buttercream


I’m in a cake mood.  It’s probably because I just sent off these cranival-themed cupcakes this morning.

Buttered popcorn and sprinkles--can't go wrong!

And I’m mulling over how I’m going to make a rocket ship cake for the boys this week.  I’ll update you on that one once it all comes together.

So I thought I’d do another installment in our cake series.

A little over a month ago, Kimiko posted her smooth and creamy buttercream.  The Swiss meringue buttercream I want to share today is almost the same.  Hers is a bit sweeter and I start with cartoned egg whites rather than whole eggs.  But I thought I’d throw in some technique tips for those who haven’t made it before.  It can be a bit tricky and frustrating if you’ve never done it before.

Kimiko's mint buttercream!

This is a very time-consuming frosting.  It takes me about 30 minutes from start to finish.  But it is so worth it!!  It tastes delicious, spreads smooth, and pipes great!

Spreads smooth...

...but also adds fabulous texture.

Why cartoned egg whites?  I make LOTS of frosting.  Saving the time it would take me to separate eggs is worth paying a little extra, especially since I can charge my customers the difference.  And I never need to worry about contamination.  And I don’t need to figure out what to do with all those yolks.

No separating--just measure.


Simple:  butter, sugar,
egg whites, and vanilla
Swiss Meringue Buttercream
2 lb. unsalted butter, softened
2 c. sugar
1¾ c. egg whites (about 10 egg whites)
1½ Tbsp. vanilla


Place large saucepan with 1-2” water over medium-high heat to bring to simmer.  Meanwhile, fill a large mixing bowl with cold water; set aside.

I use my 5-qt. Pyrex.

In heat-proof mixer bowl, combine sugar and egg whites.  Place bowl over pan of simmering water and whisk continually.  You may need to turn down the heat if it goes beyond a simmer.  Continue to whisk until egg whites are just about too hot to touch.  Don't let the eggs cook!  If you end up with bits of cooked egg in your mixture, just run it through a strainer.


Immediately place mixing bowl in cold water.  Add ice cubes to water.  Keep egg white mixture in water bath until completely cool, may take 15 minutes or more.


Meanwhile, with paddle attachment, beat butter until light and fluffy.  Set aside.  (Note: if you only have one mixer bowl, you’ll want to do this before heating the eggs.  Transfer beaten butter to another dish and wash bowl thoroughly before continuing with eggs.)


Once egg whites are cool, whip on high with whisk attachment until stiff peaks form.  Reduce speed to medium and add butter a few tablespoons at a time, allowing sufficient mixing time between additions.


A little at a time!

At some point during this step, the buttercream will probably separate and look curdled---keep going!  This is normal.  Eventually it will start to come together and get smooth; this may take 15 minutes or more.

I know, this looks scary and like it's a failure.  Keep going!
Notice the liquid on the side of the bowl.

Add vanilla and mix in thoroughly.  Be sure there is no more liquid clinging to the side of the mixing bowl.

The curdled mess turned into this smooth deliciousness!

No more liquid!

Store in an airtight container at room temperature for a few days, in the refrigerator for a week, or in the freezer for a lot longer (I’ve used it months later and it’s still been great).  One batch will just about fill a gallon zip-top bag.  Bring to room temperature and re-whip before using.

Friday, April 20, 2012

Baked Oatmeal


I have never liked oatmeal.  I've tried so many ways to make it and would always try to force myself to eat it, hoping I'd eventually learn to like it.  However, all my attempts were fruitless.  After a few bites, I would hit that point where I physically couldn't force myself to swallow any more.  I didn't want to load it with sugar, because that would defeat the purpose of eating it in the first place!  However, that all changed when I came across this recipe for Baked Oatmeal from Skinny Taste.  To my surprise, I really liked it!  I did alter it just a tad.  Keep in mind, though, that it's still not super sweet, but the fruit adds just enough sweetness for me.  I'm the type of person who enjoys regular Cheerios with no added sugar, so if you like really sweet cereals, this may not be for you (or you may want to add some extra sugar, honey, or a mashed up banana or two and add it to the wet ingredients).

Baked Oatmeal
2 medium bananas, sliced into 1/2-inch pieces
1 1/2 cup blueberries (or other berries), divided
1 tsp cinnamon, divided
1 cup uncooked quick oats
1/4 cup chopped almonds, divided
1/2 tsp baking powder
Pinch of salt
1 cup milk
3 Tbsp honey
1 egg
1 tsp vanilla extract

Preheat the oven to 375 degrees.

Lightly grease an 8-inch square pan.  Place the sliced bananas in a layer in the bottom of the pan, followed by 3/4 cup blueberries and 1/4 tsp cinnamon.  Cover with foil and bake for 10-15 minutes, or until the bananas are soft.


While the bananas and blueberries are baking, combine oats, 1/8 cup chopped almonds, baking powder, remaining cinnamon, and salt.  Mix well; set aside.


In another bowl, combine milk, honey, egg, and vanilla.  Wisk until well combined.

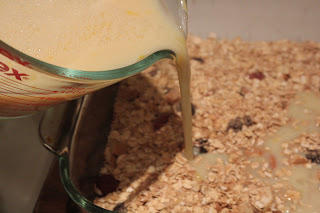
Remove the bananas from the oven and put the oat mixture over the bananas, followed by the liquid ingredients.  Sprinkle the remaining 1/8 cup almonds and 3/4 cup blueberries over the top.  Bake, uncovered, for 30 minutes or until the top is golden brown and the oatmeal is set.  Serve warm.  I usually make up a batch at night and keep it in the refrigerator for almost a week.  Each morning, I just stick a piece in the microwave to reheat it.


It looks pretty runny before it's baked.

But don't worry.  It bakes up nicely!

This one has mixed berries in it.

Wednesday, April 18, 2012

Peanut Butter Filling Dip


Remember Kimiko's oh-so-yummy peanut butter filling?


The one that is amazing with chocolate cake and caramel?


Well, it's not just for filling cakes!  As she mentioned in her original post, our dad used it to make a peanut butter cookie sandwich.  I think I need to try that with Kimiko's gluten-free peanut butter cookies!


When I have leftover filling, I sometimes use it as a treat for my kids.  Apples are great dipped in it!


And on the very rare occasions that we have animal crackers in the house, I like to dip them in the filling.


You could also use it to make my niece's banana cookies.


Versatility makes a sweet treat even sweeter!
Related Posts with Thumbnails