Friday, August 13, 2010

Baked Potatoes with Chili


I always have a bag of russet potatoes in my pantry.  They are cheap, yummy, nutritious, and versatile.  The 10-lb. bag I currently have cost me $1.98, though it is not uncommon to find 10-lb. bags for only $0.99.  Since they are so cheap and filling, I love using potatoes to bulk up my meals.  Some of my favorite potato dishes include baked potatoes, mashed potatoes, oven fries, and potatoes O’Brien.  My husband Robbie loves scalloped potatoes.

I recently had an “it’s 4:30 and I have no clue what’s for dinner” day.  After a brief survey of my freezer and pantry, I settled on baked potatoes with leftover spaghetti sauce chili.

To save time and money on the electricity bill, I make baked potatoes in the microwave.  Despite what some marketing genius would have you think, you do not need to buy any special potato to bake it in your microwave.  These expensive individually shrink-wrapped potatoes that are now available in your grocer’s produce section are the same as the ones you pull out of your 10-lb. bag.


After washing, I generously pierce each potato with a fork and arrange them on a microwave-safe plate, ends pointed toward the middle like spokes on a wheel.


My microwave has a handy potato button that automatically cooks them for the right amount of time.  If yours does not, simply cook them for the time appropriate for the amount of potatoes (keep in mind microwaves vary—adjust accordingly).

# potatoes                   Minutes
            1                         3:00
            2                         5:10
            3                         7:20
            4                         9:50
            5                      11:10
            6                      13:00

Once they are done in the microwave, tightly wrap them in foil (I wrap them in pairs) and let them sit for 5 minutes.  Do not skip this step as they are not actually done and will continue cooking during this time.


While the potatoes are cooking, I heat the chili on the stove; and while they are resting, I cook frozen broccoli in the microwave.  Put it all together with some cheese and sour cream and you’ve got a delicious meal.


Baked Potatoes with Leftover Spaghetti Sauce Chili
Russet potatoes, baked
Broccoli, cooked
Cheese
Sour cream
Salt
Pepper

Cut open baked potato.  Layer remaining ingredients on top.


Thursday, August 12, 2010

A Glimpse of Real Life

I don't know about you, but I often look at other bloggers and think they have everything in order and under control...all the time.  Well, we here at Near to Nothing are keeping it real by letting you in on little glimpses of our very real, very normal, and very not-all-put-together lives!

Have you ever made one of those meals where it seems like you've used every dish, utensil, and ingredient in your kitchen?  I made one of those a couple nights ago.  Now, my kitchen is very small to begin with, so it doesn't take much to make it look messy, but this is a bit extreme.   I guess I need to learn that technique called "cleaning as you go."


And don't worry, it's all cleaned up now!

Wednesday, August 11, 2010

Homemade Pancake Mix

I love making breakfast for dinner.  It's usually cheap, quick, and delicious!  When it comes to breakfast, my favorite foods are those heavily laden with carbs - waffles, pancakes, muffins, bagels - they are comfort foods for me.

Tonight I made pancakes...from scratch.  Yes, I know you can buy a box and just add eggs, milk, and oil and move on with your day, but I don't mind measuring a few extra ingredients in order to save a buck or two.  I also know that you can buy pancake batter, which requires you to simply shake a bottle and pour.  Why stop there though, when you can buy frozen pancakes!  Just stick them in the microwave and - BAM! - you've got pancakes.

The recipe I'm posting today isn't my usual pancake recipe, which I'll share another time.  This recipe has become my dad's go-to pancake recipe.  The nice thing about it is that it makes a pancake mix, so once the mix is made, it won't require much more work than a store-bought mix would.  The original recipe is from Alton Brown, but as you'll quickly learn - if you haven't already - I like to tweak recipes just a bit.

Homemade Pancake Mix
6 cups all-purpose flour
1 1/2 tsp baking soda
3 tsp baking powder
1/2 Tbsp salt
2 Tbsp sugar

Place ingredients in a sealable container and shake well to mix.  Store in an airtight container for up to three months.

Before I get into how to turn the mix into actual pancakes, I want to explain a few things.  First of all, if you've never separated eggs, it's a simple process and doesn't require any special equipment.  Yes, there are egg separators, but they're definitely not necessary.
Egg Separator
Here's a brief video on how to separate an egg without a separator - all you need is the egg itself and a couple bowls in which to put the white and yolk.

Second, I think I've only bought buttermilk once.  I know this recipe would probably be a little better with real buttermilk, but I know I wouldn't use the whole container and would end up throwing some of it out.  If you, like me, don't have buttermilk, sour milk is a great substitute.  For every cup of milk, add one tablespoon of white vinegar or lemon juice.  The important thing to remember (which I forgot today, resulting in thinner pancakes than I would like) is to put the vinegar or lemon juice in the measuring cup first, then add the milk to make a full cup.  Another alternative would be to buy buttermilk powder, which lasts longer than buttermilk.


Finally, not all whisks are created equal (or at least in my kitchen, they're not).   I like the whisk on the bottom, because it mixes things so well due to the many wires it has.  However, as I mention below in the recipe, you don't want to over mix your pancake batter.  I have found that when I use the whisks with more wires, it easy to accidentally over mix.  So for this recipe, I'll be using the good, old-fashioned whisk.


Pancakes
2 eggs, separated
2 cups buttermilk (or 2 Tbsp vinegar or lemon juice mixed with enough milk to make 2 cups)
4 Tbsp melted butter
2 cups homemade pancake mix (see recipe above)
1 tsp vanilla extract

Preheat a griddle or skillet over medium heat.  Place pancake mix in a large bowl and set aside.

Whisk egg whites and buttermilk in small bowl or measuring cup (I mixed them in my 4 cup measuring cup) and set aside.  In a separate bowl, whisk melted butter with egg yolks.  Pour egg yolk mixture into buttermilk mixture and stir to combine.  Add vanilla.

Pour liquid mixture over pancake mix and whisk, being careful not to over mix.  For pancakes, you want a few lumps to remain in the batter.

Ladle batter (the amount depends on the size you want your pancakes to be) onto your preheated and greased griddle or skillet.

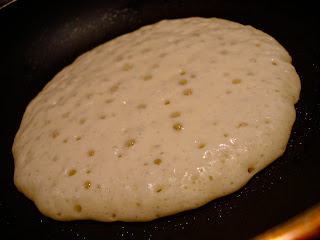
When bubbles appear, and the edges begin to look dry, carefully flip the pancake.

Cook another 2 to 3 minutes, or until the pancake is cooked through and is golden brown on the outside.
Remove from heat.  Pancakes can be kept warm by placing in a 200 degree oven.  Serve with your favorite pancake toppings and enjoy!


If you have leftovers, cool completely then wrap in saran wrap or place in a zip top bag and freeze.  When you're ready to eat them, put them in the microwave for 30 to 60 seconds, or until warm.  See, you can still have convenient frozen pancakes!

Monday, August 9, 2010

Overly Ripe Bananas = Great Banana Bread!

If your family is anything like mine, you often end up with brown bananas sitting on your counter.  I don't usually mind this happening, because when they're too ripe to eat, they're perfect for banana bread!  If I'm not ready to make banana bread right then, I just pop the bananas in the freezer.  When I'm ready to use them, I pull them out and let them defrost.  Once they're defrosted, I cut off one end and simply squeeze the banana out of the peel!


Banana Bread
2 c. flour
1 tsp baking soda
1/2 tsp salt
1/2 c. butter
1 c. sugar
2 eggs
1 c. mashed bananas (approx. 2 large or 3 medium bananas)
1/3 c. milk
1 tsp lemon juice or vinegar
1/2 c. chopped walnuts (optional)

Preheat oven to 350 degrees.  Grease and flour a 9 x 5 x 3-inch pan (or three small loaf pans).


In a medium bowl, mix flour, baking soda, and salt.

In a large bowl, cream butter.  Gradually add sugar, creaming well.  Add eggs and bananas; blend thoroughly.

Notice how brown the bananas got in the freezer.  The picture at the opening of this post is what they looked like when they went into the freezer.  Don't be alarmed when they come out looking like this - they are still good.

Combine milk and lemon juice in measuring cup.  Add dry ingredients to banana mixture alternately with the milk, beginning and ending with the dry ingredients, blending well after each addition.


Stir in walnuts (my husband prefers it without nuts, so I leave them out).   Pour batter into pan(s) and bake at for 60 to 70 minutes for a large loaf or about 45 minutes for three small loaves (6 x 3.5 x 2).


When the bread is done, it should spring back when it is lightly touched in the center of the loaf.  Remove bread from pan and cool on a wire rack.


The great thing about this is that you can freeze not only the bananas until you're ready to use them, but you can also freeze the bread once it's baked.  I usually make three small loaves.  This allows more flexibility with the bread.  We can have one loaf out to eat and either give away the extra loaves or freeze them until we're ready to eat them.  Freezing the extra loaves will keep them fresher than if I had just baked a large loaf and let it sit on the counter until we could finish it.

Friday, August 6, 2010

Cheap=Unhealthy?

There seems to be a mass misunderstanding among Americans that cheap food cannot be good for you.  If you watch TV commercials, you will see what I mean.  I can go down the street to Taco Bell and get a “value” meal for $4.  Or I can go over to McDonald’s and get a Mini Meal for $3.  I’ve heard personal stories on TV from people struggling with obesity:  “My mom tried to do her best, but we were poor so we ate a lot of fast food.”


What?!?!  We don’t eat fast food because money is tight!  Not that we would eat much of it if we had more money.  But the point is that I can feed my family a healthy meal at home for a lot less than at a fast food restaurant.  Three or four dollars doesn’t sound like that much for a meal, but multiply that times five, add sales tax (9.25% where I live), and it would cost us $16.39-$21.85 to eat one meal at Taco Bell or McDonald’s.

When I am planning my meals, I try to aim for $5 per dinner—for the whole family.  While this sounds almost impossible, it isn’t so bad if you follow a few simple rules.
  1. Use meat sparingly.  Better yet, cut it out and replace it with other sources of complete proteins (e.g. grains and legumes, eggs).
  2. Cook more than you need.  If you’ve prepared a freezable meal, divide it up into useable portions for another night’s dinner or another day’s lunch and keep it in the freezer to reheat when ready.  If the meal you prepared will not freeze well, eat the leftovers another night or pack them as lunches.
  3. Buy plain, dry ingredients.  Dried beans are much more economical than canned beans and don’t contain all the added salt and sugar (yes, they add sugar to canned beans).  Regular rice, white or brown, costs a lot less than processed minute-type rices or bagged or boxed rice mixes.  Dry pasta is cheaper than refrigerated.
  4. Use frozen vegetables.  Vegetables mainly come fresh, canned, or frozen.  Of these three options, canned is the most expensive and the least nutritious.  The canning process causes the breakdown of nutrients.  And unless you are buying fresh produce from a farmer’s market or farm stand or are growing your own, frozen vegetables are more nutritious than “fresh.”  Frozen vegetables are frozen within hours of being harvested.  This stops the breakdown of nutrients.  They are also usually cheaper than fresh vegetables and are much easier to store and keep on hand.
  5. Plan your meals.  By planning your meals ahead of time, you can make meals that use the same ingredients so nothing goes to waste and you need to buy less.
With a little effort, anyone can prepare healthy meals with minimal cost.  For the amount of money my family would spend at a fast food restaurant for one meal, I can prepare three to four meals.  Thank you, Taco Bell and McDonald’s, for your “value” meals, but we’ll be eating at home tonight.

Wednesday, August 4, 2010

Egg Salad


Eggs are a great source of protein.  A few days ago I bought a dozen eggs for 99¢.  That makes them only 8.25¢ each.


One of my favorite eggs dishes is egg salad.  Not only is it a super cheap sandwich filling, but it is incredibly quick and easy to make.  And I always have all the ingredients on hand.

The longest step in the process is boiling the eggs.  There is a lot of debate out there as to the best way to hard-boil eggs.  I simply place the raw eggs in a single layer in a saucepan, cover with water, and bring to a boil.  Once the water is boiling, I set a timer and continue boiling them for 10 minutes.  I immediately remove the pan from the heat and run the eggs under cold water for a few minutes to stop the cooking process.

A quick hard-boiled egg tip:  it is easier to shell the eggs if you start with older eggs.  The fresher the eggs are before you boil them, the more the shell sticks to the cooked white.


The easiest way to chop the cooked eggs is in the same manner you would chop potatoes for Kimiko’s breakfast burritos.


Egg Salad
5 eggs, hard-boiled, shelled, and chopped
¼ c. mayonnaise
1½ Tbsp. prepared mustard
¼ tsp. paprika
Salt, to taste
Pepper, to taste

In a small mixing bowl, stir together eggs, mayonnaise, mustard, and paprika.  Add salt and pepper as desired.  Yields about 1½ cups.


Monday, August 2, 2010

Leftover Spaghetti Sauce Chili

I love chili!!  Whether in a bowl by itself, poured over nachos, or on top of a baked potato, you can’t go wrong.

Most chili enthusiasts will tell you that real chili should be made by slow cooking a cut of beef such as a chuck roast.  I would agree that this produces the best chili.  But I have four kids.  Sometimes I need something quick and easy.  Out comes some frozen leftover spaghetti sauce.  With the simple addition of chili powder, spaghetti sauce is transformed into chili!!


Many chili aficionados will also tell you that real chili should not have beans in it.  I personally like beans in my chili.  Not only do beans taste good, but they are a simple, cheap way to make the chili go farther.  And they add fiber.  I always start with dried beans since they cost much less than canned beans.


Chili powder is available in a few different ways.  The first and most expensive way to buy it is in little packets.  Not only do the packets cost more, they don’t offer you the flexibility to adjust the amount.  The next best alternative is to buy a jar or bottle.  The cheapest (and my favorite) way to buy chili powder is from the bulk bins.  When I get it home, I transfer it to a canning jar to maintain freshness.  Last time I was at WinCo I priced chili powder in packets, jars/bottles, and the bins (Hy-Top is WinCo’s store brand):

Packets
McCormick, 1.25 oz.--$0.97 (77.6¢/oz.)
Hy-Top, 1 oz.--$0.44 (44¢/oz.)

Jars/Bottles
McCormick, 2.5 oz.--$1.68 (67.2¢/oz.)
McCormick, 4.5 oz.--$2.77 (61.6¢/oz.)
McCormick, 9.25 oz.--$5.68 (61.4¢/oz.)
Spice Pantry, 2.5 oz.--$0.50 (20¢/oz.)

Bulk Bins--$2.84/lb. (17.8¢/oz.)


You may want to add the chili powder gradually, tasting as you go.  I like a little heat in my chili.  If you don’t want it as spicy, add less.


Leftover Spaghetti Sauce Chili
2 qts. leftover spaghetti sauce
1 qt. drained beans (small red, kidney, or chili)
1 c. chili powder
Assorted toppings, optional (shredded cheddar, sour cream, chopped onions, etc.)

Combine all ingredients in large pot over medium heat.  Simmer until heated through, stirring occasionally.  Yields 3 qts.  Total cost:  about $5.  Unit cost:  about $1.67/qt.

Southwest style:  Stir in frozen corn and/or serve with tortilla chips.
Cincinnati style:  Serve over hot spaghetti.
Japanese-American style:  Serve over hot white rice.

Unfortunately I didn’t weigh the chili when I was done.  But I can assure you that it cost less to make it than it would have cost me to buy canned chili (which I don’t like anyway).  At WinCo last week, canned chili cost anywhere from $0.88-$1.51 for a 15 oz. can.


Related Posts with Thumbnails