Monday, November 29, 2010

Macaroni and Cheese--the Ultimate Comfort Food


There’s nothing like a big bowl of macaroni and cheese to take you back to your mom’s kitchen table.  We all grew up with it, and almost every kid recognizes the blue and yellow box.  It was one of the first things I learned how to cook as a little girl, and it sustained me through many late nights in college.  And while I still occasionally enjoy macaroni and cheese from a box, I now know how to make super cheesy, super easy macaroni and cheese from scratch.


The technique used to make the cheese sauce is a basic skill that every cook should master.  If you watch cooking shows, you have seen it many times.  It starts with a roux (pronounced rū, rhymes with stew), which is a mixture of a fat and flour.  Roux is used as a thickening agent in many different types of dishes.  It is the key to making gravy without lumps.

I almost always make roux with butter.  Once the butter is melted, I add the flour and stir until bubbly.  You want to be sure to bring it to bubbling to cook off the flavor of the flour.  The longer a roux cooks, the darker it gets.  Recipes will sometimes instruct you to make a light roux, medium roux, or dark roux; this is an indication of the color.  You must be careful not to overcook the roux for your specific recipe, because the darker the roux, the less thickening power it has.

Roux

The addition of milk or cream to a roux results in a béchamel, or a white sauce.  This sauce is also the base for many recipes such as cream soups and cheese sauces.

Be careful to avoid spills--the after the milk is added
and heats up, it will foam up quickly.

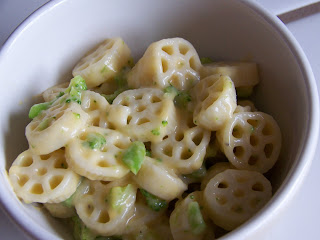
In our house we have to use
"car pasta" or "tire pasta."
Baked macaroni and cheese
1½ c. macaroni, small shells, wagon wheels, or other small pasta
2 Tbsp. butter
2 Tbsp. flour
1½ c. milk
3 slices American cheese
3 oz. cheddar, shredded, plus more for sprinkling on top
Salt and pepper, to taste
½ c. bread crumbs
2 Tbsp. butter, melted


Preheat oven to 350°.  Grease 8-inch square pan; set aside.  Cook pasta according to package directions; drain and set aside.  In medium saucepan, melt butter over medium heat.  Add flour; stir and cook until bubbly.  Stir in milk and bring to boil, stirring constantly.  Continue to boil 1 minute.  Remove from heat.  Add cheese; stir until melted.  Season with salt and pepper as desired.  Combine with cooked pasta; pour into prepared pan.  Sprinkle with extra cheddar cheese.  Mix bread crumbs with melted butter and sprinkle over pasta.  Bake 30 minutes or until lightly browned.  NOTE:  double recipe for 9”X13” pan.


Variation:  substitute 1½ c. chicken broth for the milk, omit salt.  This results in a less creamy, more savory macaroni and cheese.

This recipe is intended to be for baked macaroni and cheese.  The crispy bread topping pushes it from wonderful to amazing.  However, kids (including my six-year-old) tend to prefer stove-top macaroni and cheese.  No problem!  Just serve it after mixing the cheese sauce with the pasta.  You can even mix in some leftover veggies.


Since my husband and I really like the baked version, I leave half as stove-top macaroni and cheese for the kids and I bake the other half in single-serving sized dishes for us.  If your dinnerware is oven-safe, you can bake it right in your bowls.  You can also use ramekins or Pyrex custard cups.  Be sure to serve the bowls on a plate and warn everyone that they are hot.


Friday, November 26, 2010

Black Friday Casserole (aka Leftover Casserole)


Thanksgiving is over.  Now what to do with all those leftovers?  Leftover casserole!!!  There are no quantities because you just use what you have.  The flavor will vary depending on how the individual components were made.

To make it easy on myself, I always put this casserole together as I am putting the leftovers away.  The next day, I just pop it in the oven--no prep!

Leftover Casserole
Mashed potatoes
Vegetables
Turkey
Turkey gravy
Stuffing

Coat a casserole with mashed potatoes.


Add a layer of vegetables.


Cover with chopped turkey.


Pour gravy over turkey.


Cover all with stuffing.


Bake, covered, at 350 degrees until hot throughout.  A 2-quart casserole takes about 30-40 minutes.  Uncover for last 5 minutes for a slightly crispy top.

Wednesday, November 24, 2010

Loaded Thanksgiving Stuffing


I am very particular about stuffing—it has to be moist, full of flavor, and free of giblets.  And I have a confession to make:  I really like Stove Top stuffing.  Yes, I enjoy stuffing from a mix.  But for Thanksgiving, the stuff from a box just doesn’t cut it.


This recipe is an adaptation of a recipe that was given to me by a dear woman who mentored me through college.  She was an amazing cook and often prepared meals for large groups of people.  While the original recipe is amazing, I have altered it to fit my family’s preferences.


Chicken apple sausage is now available in most grocery stores.  I buy a local brand, Aidells, but there are countless companies that make it.  It definitely exceeds my $2/lb. limit on meat, but I only make this stuffing once or twice a year.

To help keep the cost down, I buy the nuts and dried fruit from the bulk bins at WinCo, and I make the broth from bouillon, using 2 tsp. for each cup of water.


Toasting nuts deepens their flavor.  To toast the pecans, simply put them on a rimmed baking sheet and bake them at 350° for about 5 minutes, stirring once or twice during baking.

I love using my Pampered Chef food chopper for nuts.

Before toasting
After toasting--notice the darker color


This can also be done in a dry skillet over medium-high heat.  Be sure to stir the nuts often to avoid burning.


Though you can use a pear in this recipe, I am allergic to them so I always use an apple.  Fuji apples are my go-to apple for everything.  They are great in this recipe because they do not get soggy or mushy.  One of my favorite apple tricks is to use my melon baller to remove the core.  Just as I use my egg slicer for olives and strawberries and my potato masher for refried beans, I do not believe my melon baller should be used only for melons.


Loaded Thanksgiving Stuffing
½ c. butter
1 large onion, chopped
1 rib celery, chopped
1 apple or pear, diced
1 c. pecans, toasted and coarsely chopped
¾ c. dried cranberries, raisins, cherries, or a mixture
8 oz. pre-cooked chicken apple sausage, chopped
2 pkgs. (about 10 oz. each) herb stuffing
4-5 c. chicken broth or stock


In large skillet, melt butter over medium-high heat.  Add onion and sauté until soft and translucent.  Add celery, apple, pecans, cranberries, and sausage.  Continue to cook until soft.


Pour stuffing into large bowl, add vegetable mixture, and stir to mix.  Gradually add broth to moisten as desired.


Transfer to buttered casserole.  Bake, covered, at 350° for 30-40 minutes or until heated through.  Remove lid for last 5 minutes for a slightly crispy top.  Yield:  enough to stuff a large turkey* and fill a 3-quart casserole.  (Unfortunately I did not get a photo of the finished product before it got eaten.  Imagine the above picture but a lot darker.)

Make ahead directions:  This can be made the day ahead and refrigerated before baking.  Allow extra baking time.

You can also make the sausage and vegetable mixture and refrigerate it before mixing into the stuffing mix.  Because this recipe makes so much stuffing, I make it to this point and divide the sausage and vegetable mixture in half if I am just cooking for my family.  I mix one half into one package of stuffing and moisten with 2-2 1/2 cups of broth.  I freeze the other half of the mixture for another batch later.

*If you choose to stuff your turkey, be sure to follow the food safety guidelines found at the links from Sunday's post.

Monday, November 22, 2010

A Staple Thanksgiving Side Dish: Roasted Garlic Mashed Potatoes


It's Thanksgiving week, so we'll be highlighting some of our favorite Thanksgiving side dishes!  I think most people consider mashed potatoes to be a Thanksgiving dinner staple.  There are many variations of mashed potatoes, but one of my favorites is roasted garlic!

When it comes to mashed potatoes, you can really use any kind of potato.  I typically use Russet because they're the cheapest, but red potatoes make for creamier mashed potatoes.  If there's ever a time to "splurge" on potatoes, Thanksgiving is it! There aren't exact measurements for this recipe, because it's very much a taste-and-adjust-to-meet-your-preferences type of dish.

Roasted Garlic Mashed Potatoes
3 to 4 lbs. potatoes
2 bulbs roasted garlic
3 oz. cream cheese
5 Tbsp. butter
Milk
Salt and pepper, to taste

Wash and peel potatoes, if desired, then cube.


Place in a large pot and cover with water.  Boil potatoes until tender; drain.  Return potatoes to pan.  Mash potatoes, using a potato masher, fork, or hand mixer (I usually use a fork, but would prefer a potato masher if I had one).  Add butter and cream cheese; mix well.  Add roasted garlic (you may want to start with one bulb and taste before adding the second) and mix until well combined.


Add milk, if necessary, to reach desired consistency.  Season with salt and pepper to taste.  Savor and enjoy!  I think these are good enough that you don't even need gravy!


To make your meal preparation a little bit easier, you can cut the potatoes in the morning and cover them with water to prevent browning.  When you're ready to make the potatoes, simply put them on the stove and cook!

Sunday, November 21, 2010

Thanksgiving Tips

Happy Thanksgiving Sign 12" X 17½"
It's Thanksgiving week, and even though Thanksgiving is still four days away, it may not be too early to start preparing for your big feast, especially if you have a frozen turkey.  We've gathered a couple helpful websites and phone numbers to take some of the guesswork out of your Thanksgiving meal preparation, including how to defrost a turkey and how long to defrost a turkey.  If you're cooking on Thursday, you may want to take a look at these today!

  • Defrosting, roasting, and storing turkey
  • Butterball's Plan Perfect Portions Calculator can help you determine just how big of a turkey you're going to need.
  • Butterball's Turkey Talk-Line: To talk to a representative, call 1-800-BUTTERBALL (1-800-288-8372) weekdays from 10 am to 7 pm CST or anytime for an automated response.  You can also ask a question via email.
  • Crisco's Pie Hot Line: Representatives are available at 1-800-FORPIETIPS (1-877-367-7438) to answer questions weekdays (except Thanksgiving) from 9 am to 7 pm to EST, or you can receive an automated response anytime.
  • USDA meat and poultry line: 1-888-674-6854
  • Miscellaneous Thanksgiving tips
  • And just for fun - how not to gain weight (yeah right!)

Check back for some of our favorite Thanksgiving side dishes starting tomorrow!

    Saturday, November 20, 2010

    We're Now Printer Friendly!

    Our goal at Near to Nothing is to make our site as user friendly as possible.  One way we've done this is by making it easier for you to print your favorite recipes!  At the bottom of each post, there's a "Print Friendly" button, which allows you to remove photos and select which text you want to print.  This way, you'll be able to print only the recipe if you desire.  We hope this will be a resourceful tool for all of you, and if there's any other ways we can make our site easier for you to use, please don't hesitate to let us know!

    Additionally, we've expanded our Recommended Resources page to include links for things such as common ingredient substitutions and food safety.  Be sure to browse through these resources for helpful tips, ideas, and information!

    Also, be sure to check tomorrow for some helpful turkey tips and for some of our favorite Thanksgiving recipes later in the week!

    Friday, November 19, 2010

    Hot Fudge Sundae Cake


    If you are not familiar with the story behind Near to Nothing, please take 20 seconds to read it at the top of the right-hand column.  This recipe embodies the spirit of Near to Nothing in that it is one of our great grandmother’s recipes and it uses inexpensive ingredients that should be in every kitchen.

    The original recipe as made by our great grandmother is baked in the oven.  I have more recently been making it in the slow cooker.  I try to use my oven as little as possible—it is old, out of calibration, inefficient, and heats up the main part of the house.  The slow cooker uses a lot less electricity and puts off less heat.

    Great Grandma used water for the fudge part of this cake.  Occasionally, I substitute the water with cream for a richer dessert.

    Hot Fudge Sundae Cake
    1 c. flour
    ¾ c. sugar
    6 Tbsp. cocoa, divided
    2 tsp. baking powder
    ¼ tsp. salt
    ½ c. milk
    2 Tbsp. vegetable oil
    1 tsp. vanilla
    1 c. brown sugar, packed
    1¾ c. hot water or cream
    Vanilla ice cream and/or whipped cream (optional)


    Grease bottom and sides of 2- or 3-quart slow cooker crock.  In medium bowl combine flour, sugar, 2 Tbsp. cocoa, baking powder, and salt.  Stir in milk, oil and vanilla until smooth.  Pour into slow cooker.


    In small bowl, combine brown sugar and remaining 4 Tbsp. cocoa.  Sprinkle over cake batter.  Pour hot water or cream over; do NOT stir.

    Brown sugar should be packed to ensure proper measuring.
    When properly packed, it should hold the shape of the
    measuring cup when dumped out.  The crack indicates
    that I should have packed it a little tighter.


    DO NOT STIR!!!  The liquid will form the fudge as it bakes.

    Bake on high about 2 hours or until toothpick inserted in center comes out clean.  Turn slow cooker off and set lid ajar to allow cake to cool about 30 minutes before serving.  Serve with ice cream or whipped cream if desired.  This cake is also great served chilled (I actually prefer it this way).


    To make in the oven, assemble in 9-inch square baking pan.  Bake at 350° for 35-40 minutes.

    Wednesday, November 17, 2010

    Not Your Typical Chili

    The weather has turned cold - and I love it!  I'm excited to start adding soups, stews, and chili back into my meal plans!  All the conditions are right for my favorite chili!  It's not your typical chili - it's better (in my opinion, anyway).  I have a confession to make: I don't like ground meat.  And because I don't like ground meat, I was never a huge fan of chili.  I liked the flavor, but it was always such a chore to work around the ground beef in order to get to the beans.  Even the smallest piece of ground beef in my mouth would make me cringe!  So when my dad introduced me to chili using chunks of beef instead of ground beef, I was so excited!!!

    This recipe is not for the chili faint of heart - it's loaded with flavor and packs some heat!  The recipe calls for chuck roast which is one of my favorite cuts of meat.  Stores often put chuck roast on sale for under $2 per pound.  When they do, I make sure I have room in my freezer and stock up!  Chuck roast is not a tender cut of meat, but if cooked properly (slow and long), it can become deliciously tender.   I already had a couple chuck roasts and some chipotles (leftover from another meal) in my freezer, as well as some diced tomatoes that I had purchased on sale several months ago, so I really didn't need to buy much for this recipe.  Also, you'll need at least a 5-quart slow cooker in order to make this recipe.  Mine is 5-quarts and was filled to the brim!

    Chili Con Carne
    6 (6-inch) corn tortillas
    3 cups water, divided
    3 tsp. chicken bouillon (or eliminate the water and use 3 cups chicken broth)
    28 oz. diced tomatoes with juice
    5 canned chipotle chiles in adobo sauce
    1 1/2 Tbsp. brown sugar
    5-7 lbs. chuck roasts, trimmed and cut into 1/2- to 3/4-inch pieces
    Salt and pepper
    5 Tbsp. vegetable oil
    1/4 cup water, plus 2 Tbsp.
    3 medium onions, chopped
    2 medium jalapenos, stemmed, seeded, and minced
    6 Tbsp. chili powder
    2 Tbsp. ground cumin
    8 cloves garlic, minced
    4 cups kidney beans
    1 tsp. oregano

    Heat a large skillet over medium-high heat.  Add as many tortillas as will fit and cook until blistered on both sides; about 2 minutes per side.  Remove from heat and repeat with remaining tortillas.  Tear tortillas into smaller pieces and place in a microwave-safe bowl with 2 cups of water and the chicken bouillon.  Microwave on high for 2-3 minutes, or until the tortillas are saturated.  In a blender or a food processor, puree the mixture until smooth.  Place the pureed mixture into your slow cooker.

    Place tomatoes and chipotles into the food processor or blender and puree until smooth.  Add the tomato mixture to the slow cooker, along with the remaining 1 cup water and brown sugar.

    Dry the beef thoroughly and season with salt and pepper.  Heat 2 tsp. oil in a skillet over medium-high heat.  Place 1/3 of the meat in the skillet and sear on all sides.  Remove meat from skillet and repeat with remaining meat.  Once all the meat has been seared and removed from the pan, add 1/4 cup water and scrape all the bits of meat that have stuck to the pan (this is called deglazing the pan).  Boil until there's hardly any water left.  Pour the remaining contents of the pan into the slow cooker.  Wipe the skillet with a paper towel.

    Put the remaining 3 Tbsp. oil in the skillet and heat.  Add onions, jalepenos and 1/4 tsp. salt; saute until soft.  Stir in chili powder and cumin; cook, stirring occasionally until spices are deeply fragrant.  Add garlic and heat until garlic becomes fragrant.  Transfer vegetables to slow cooker.  Add 2 Tbsp. water to skillet and scrape any spices that are left, then transfer to slow cooker.

    At this point, you can put the meat and the slow cooker mixture in the refrigerator separately until the next day or you can put the meat into the slow cooker and continue.
    Because there's quite a bit of prep, I like to prepare everything the night before so that all I have to do is add the meat and turn on the slow cooker in the morning.

    Stir to make sure all ingredients are thoroughly combined.  Cook on high 6-7 hours or low for 9-10 hours or until meat is tender.  Add beans, oregano, and salt and pepper to taste; continue cooking for 15 minutes.  I like to serve my chili over rice; my husband likes his over macaroni.  Of course, you can always serve it a la carte or on baked potatoes!  This makes a lot of chili, so I freeze the leftovers in single meal servings.

    Some notes: This recipe calls for a lot of meat.  If you don't want to use that much meat and/or want to save money, use a little less meat and increase the amount of beans.  Additionally, if you don't like spicy food, you may want to leave out the jalapeno.  If you're looking for a more traditional chili, check out Sumiko's chili made from leftover spaghetti sauce!
    Related Posts with Thumbnails