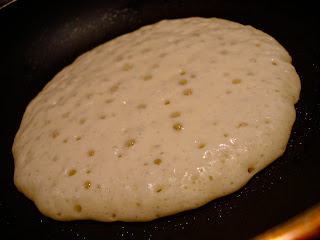
Tonight I made pancakes...from scratch. Yes, I know you can buy a box and just add eggs, milk, and oil and move on with your day, but I don't mind measuring a few extra ingredients in order to save a buck or two. I also know that you can buy pancake batter, which requires you to simply shake a bottle and pour. Why stop there though, when you can buy frozen pancakes! Just stick them in the microwave and - BAM! - you've got pancakes.
The recipe I'm posting today isn't my usual pancake recipe, which I'll share another time. This recipe has become my dad's go-to pancake recipe. The nice thing about it is that it makes a pancake mix, so once the mix is made, it won't require much more work than a store-bought mix would. The original recipe is from Alton Brown, but as you'll quickly learn - if you haven't already - I like to tweak recipes just a bit.
Homemade Pancake Mix
6 cups all-purpose flour
1 1/2 tsp baking soda
3 tsp baking powder
1/2 Tbsp salt
2 Tbsp sugar
Place ingredients in a sealable container and shake well to mix. Store in an airtight container for up to three months.
Before I get into how to turn the mix into actual pancakes, I want to explain a few things. First of all, if you've never separated eggs, it's a simple process and doesn't require any special equipment. Yes, there are egg separators, but they're definitely not necessary.
 |
| Egg Separator |
Second, I think I've only bought buttermilk once. I know this recipe would probably be a little better with real buttermilk, but I know I wouldn't use the whole container and would end up throwing some of it out. If you, like me, don't have buttermilk, sour milk is a great substitute. For every cup of milk, add one tablespoon of white vinegar or lemon juice. The important thing to remember (which I forgot today, resulting in thinner pancakes than I would like) is to put the vinegar or lemon juice in the measuring cup first, then add the milk to make a full cup. Another alternative would be to buy buttermilk powder, which lasts longer than buttermilk.
 Finally, not all whisks are created equal (or at least in my kitchen, they're not). I like the whisk on the bottom, because it mixes things so well due to the many wires it has. However, as I mention below in the recipe, you don't want to over mix your pancake batter. I have found that when I use the whisks with more wires, it easy to accidentally over mix. So for this recipe, I'll be using the good, old-fashioned whisk.
Pancakes
2 eggs, separated
2 cups buttermilk (or 2 Tbsp vinegar or lemon juice mixed with enough milk to make 2 cups)
4 Tbsp melted butter
2 cups homemade pancake mix (see recipe above)
1 tsp vanilla extract
Preheat a griddle or skillet over medium heat. Place pancake mix in a large bowl and set aside.
Whisk egg whites and buttermilk in small bowl or measuring cup (I mixed them in my 4 cup measuring cup) and set aside. In a separate bowl, whisk melted butter with egg yolks. Pour egg yolk mixture into buttermilk mixture and stir to combine. Add vanilla.
Pour liquid mixture over pancake mix and whisk, being careful not to over mix. For pancakes, you want a few lumps to remain in the batter.
Ladle batter (the amount depends on the size you want your pancakes to be) onto your preheated and greased griddle or skillet.
When bubbles appear, and the edges begin to look dry, carefully flip the pancake.
Cook another 2 to 3 minutes, or until the pancake is cooked through and is golden brown on the outside.
Remove from heat. Pancakes can be kept warm by placing in a 200 degree oven. Serve with your favorite pancake toppings and enjoy!
If you have leftovers, cool completely then wrap in saran wrap or place in a zip top bag and freeze. When you're ready to eat them, put them in the microwave for 30 to 60 seconds, or until warm. See, you can still have convenient frozen pancakes!


3 comments:
Wonderful! I love breakfast for dinner, too. :)
why do we want lumps in our pancake batter? i usually end up with dry lumps in my pancakes, which i hate to bite into, so i always break the rule and try hard to stir those lumps out!
thanks for this post, i'm looking for a good homemade pancake recipe.
Hi, Georgia! The reason you want lumps in your batter is so that you don't overdevelop the gluten. Gluten is developed when you mix flour with water and, if over developed, will make your pancakes tough. In order to avoid lumps of dry batter in your pancakes (which I've experience myself, too), you want to mix it until MOST of the lumps (especially the large lumps) are gone, and there are just some SMALL ones left. Hope that helps!
Post a Comment