Pages

Tuesday, January 24, 2017

Homemade Deodorant

Homemade Deodorant
Folks, I have stopped buying deodorant.  Early last year, I came across a recipe for deodorant that I had heard worked incredibly well.  I was a little skeptical, but also intrigued, so I filed it away mentally and moved on with my life.  The deodorant I had been using was no longer working.  I had to apply several times a day and it still didn't work.  So one day, out of desperation (and curiosity), I searched for the recipe and mixed up a batch.  I was surprised and amazed at how well it worked.  I continued using it, testing its limits (hey, I'm a mom and don't always get a shower), and I'm happy to say that it hasn't disappointed.  I told my sister about this amazing new discovery, and after a few months of her not trying it, I finally mixed up a batch and gave it to her.  She's now hooked too!  And she's also got her husband hooked.  And her 12-year-old daughter. I don't think I've ever used a deodorant that worked as well as this...nor was as cheap as this!  The great thing about it is that it is made with ingredients that I already had, and many of you probably have them as well.

Natural, homemade deodorant


Homemade Deodorant
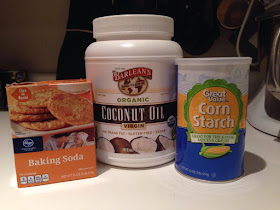
1/4 cup baking soda
1/4 cup cornstarch
6 Tbsp coconut oil
Essential oil (optional)

Mix until it's well-combined into paste-like consistency.  Place in a lidded Tupperware-type container, jar, or an empty deodorant dispenser.  If you want a scent, you can add some essential oil to it.  I don't add any scents to mine.

I store mine in little condiment cups I found at Smart & Final, but you can put it in any container/jar with a lid.  The ones I use are similar to these.  One batch filled up three cups. To apply, I just put a little on my finger and apply.  Just be careful when putting on dark-colored shirts, as the baking soda and corn starch may leave a little bit of residue.

Sumiko whipped up a batch and put it in an old deodorant dispenser.  Since it's winter and her house is cold (read: frigid :)), it works well.  She said she just has to be cautious that she doesn't twist out more than she needs, because it doesn't twist back down.  Also, if your house is warm, it may be too runny for this.
Twist out contents completely.

Remove product from plastic base. Return base to container.

Just twist and apply.

Seriously, I can't believe I'm this excited about deodorant, but I am.  Give it a try!  I think you'll like it!

Tuesday, January 10, 2017

The Great Purge of 2017


Things. We have too many of them. And they are taking over our lives.

A simple Google search of "getting rid of stuff" returns over 3 million results. As a society, we recognize the fact that we have too much--so much that our possessions are getting in the way of more important parts of our lives. Yet we also live in a very consumeristic, materialistic society that always wants more.

Since this is the beginning of a new year, I recently sat down and looked at my purpose statement, mission statements, and long-term and short-term life goals (that will have to be a different post). For my home, my mission statement reads as follows: Maintain my home as a refuge and sanctuary where my family can thrive and grow and others can be refreshed and encouraged. My someday goal for my home reads this way: Live minimally and with organization and systems such that the care of the home is a joy and not a consuming burden.

How many partial bottles of dried paint do I need? NONE!
In order to fulfill my mission and reach my goal, I need to seriously deal with the THINGS. The STUFF. Not that I haven't been trying to do that the past few years, but this year I am going to make a noticeable difference in my house. The plan requires a two-fold approach. First, we are going to control what comes into the house. Second, we are going to get rid of at least 2017 things this year. Thanks to my friend Debbie for this idea!

As I write this, we are five days into the new year, and I've already gotten rid of more than fifty (50!) items! Throughout the year, I will post updates on my progress here on the blog as well as on our FB page. If you would like to join us in our quest to reclaim the space in our homes and the time in our day, please comment to let us know. The communal encouragement will help us all be more successful.

These are the ones I got rid of. I counted every
three as one item.

BTW, one of my favorite articles about getting rid of stuff can be found here.

Friday, January 6, 2017

Make-Ahead, Freezable Carnitas

I have no new recipe for you today - just a helpful hint regarding an old recipe.  A few years ago, I had posted a recipe for my favorite carnitas.  It is still a regular meal in our house, since I can get pork shoulder cheap (and, well, it's just amazingly delicious).  And since they're large cuts of meat, I make a lot and freeze the leftovers.  I was recently able to get pork shoulder picnic roast for 69 cents/lb.  I bought almost 16 lbs and paid just under $11.  I fed 11 people (7 adults, 4 kids) dinner with some leftovers, plus bagged 3 more meals for the freezer.  You can get the recipe here.  And you can do a lot more than just make tacos or burritos with this meat.  We also like to make taco salad, quesadillas, nachos, tostadas, omelettes, etc.  This week we made burritos and filled them with carnitas, homemade pico de gallo, avocados, cheese, lime rice, lettuce, sour cream, and hot sauce.

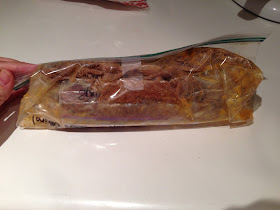
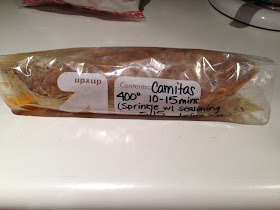
Once the meat is done cooking in the crockpot (and before it's put in the oven), I divide it up into meal-sized portions and place into gallon zip-top bags.  I also divide up the reserved seasoning into snack size zip top bags.  Then I take a seasoning bag, lay it on top of the sealed gallon bag, roll them up together, and put a piece of tape at the top to hold it all in place.  This way the meat and the seasoning are together and I don't have to worry about losing the seasoning (or forgetting where I put it :)).  Before I fill the bags, I write what's in them, the date, and cooking instructions. When I want to eat it, I pull a bag from the freezer and defrost.  I heat the meat, then place it on a large pan (I use a jellyroll pan) and sprinkle with the seasoning.  It's placed it in a preheated 400 degree oven for 10-15 minutes or until crispy.  This makes for a quick and easy meal.  In fact, before I had my last baby, I made sure I had some of this in my freezer for after baby came.

Make-ahead, freezable carnitas
Seasoning packet and meat ready to be rolled up.

make-ahead, freezable, carnitas
The seasoning packet is rolled up inside of this and
the whole thing is secured with a piece of tape.

make-ahead, freezable, carnitas
The finished product, ready for the freezer.


Tuesday, January 3, 2017

Kids' Chore Chart

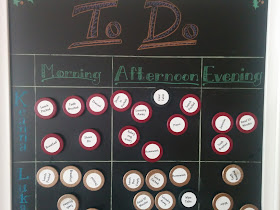
To Do Chore Chart

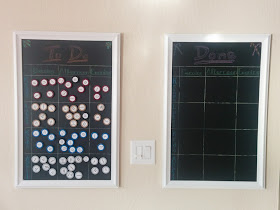
As I was evaluating where most of my wasted time and energy go, I realized it was in telling the kids to do things that need to be done on a regular basis. I needed a chore chart. I needed one that I could change as our needs changed, but I didn't want to have to keep printing them every week. And my kids are masters at losing papers.

After browsing Pinterest, I came up with a color-coded magnetic chore chart.

Each kid has chores for morning (before school/church/leaving the house), afternoon, and evening (before bed). This is great for helping the little ones keep track of what needs to be done when.

Kids' Chore Chart

I color-coded the pieces so they don't get mixed up. I also made a few black chore pieces for the chores that get rotated (feeding the bunny, sweep the dining room, etc.). 


Once a chore is done, the piece is moved from the "To Do" board to the "Done" board.

Kids' Chore Chart

I found the white framed magnetic chalkboards at Target for about $10 (they were about $20 at another local Target). I don't see them on their website.

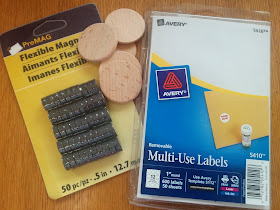
I made the chore pieces with the following supplies that I ordered from Amazon.com:
DIY Chore Chart Supplies

Using hot glue, I attached one magnet to each wooden circle. At this point, I spray painted them. I recommend painting after adding the magnets so they don't stick to the surface you are spray painting on.

When the paint was dry, I added the labels I had printed using the web-based template on Avery's website. I went ahead and created an account so I can reprint any time I need to. The labels didn't stick to April's sparkly glitter pieces, so I added two layers of Mod Podge.

After I had made all the pieces, I recruited my super talented husband to do the lettering.

Since implementing this chore chart, all I need to say is "Check the chart." And at a quick glance, I can see who hasn't done what. This has definitely streamlined those stressful parts of the day.

Monday, January 2, 2017

New Year, New Things


Well, 2016 is over and we're two days into 2017. Near to Nothing had only three posts last year--three. And yet, our site visits and page views continued at a pretty steady rate. Thank you to everyone who has pinned or shared our posts!

Life is busier than ever for both of us, but we have not forgotten about the blog or about our readers. One thing we would like to do to try to increase our posts and help you is to expand our focus. Up until now, our focus has been mainly food. We will continue with food posts as we are able, but you will see new aspects of our lives start to pop up.

As we looked around us, we realized the Near to Nothing is our philosophy for almost all areas of our lives. We would like to share how we apply those principles in areas outside the kitchen. So join us as we strive to live Near to Nothing.