Friday, September 30, 2011

Paninis


A panini is basically a grilled sandwich, but they are so tasty and are quite popular right now.  They're also easy to make and the possibilities are endless.  You can buy a panini maker, but you don't need one.  We were at my great aunt's house last year and she served us paninis for lunch.  Instead of using a panini maker, she pulled out her George Foreman grill.  It works pretty much the same as a panini maker, but costs less and can be used for things other than paninis.  I didn't have a George Foreman grill, but my aunt had an extra one lying around, so she gave it to me!  For some reason, grilling a sandwich turns it into more of a full meal than just a regular sandwich.

Paninis
Sliced bread (I used sourdough)
Butter
Meat (I used chicken)
Cheese
Vegetables (i.e. tomatoes, grilled onions, red onions, bell peppers, artichoke hearts, etc.)
Herbs (i.e. fresh basil)

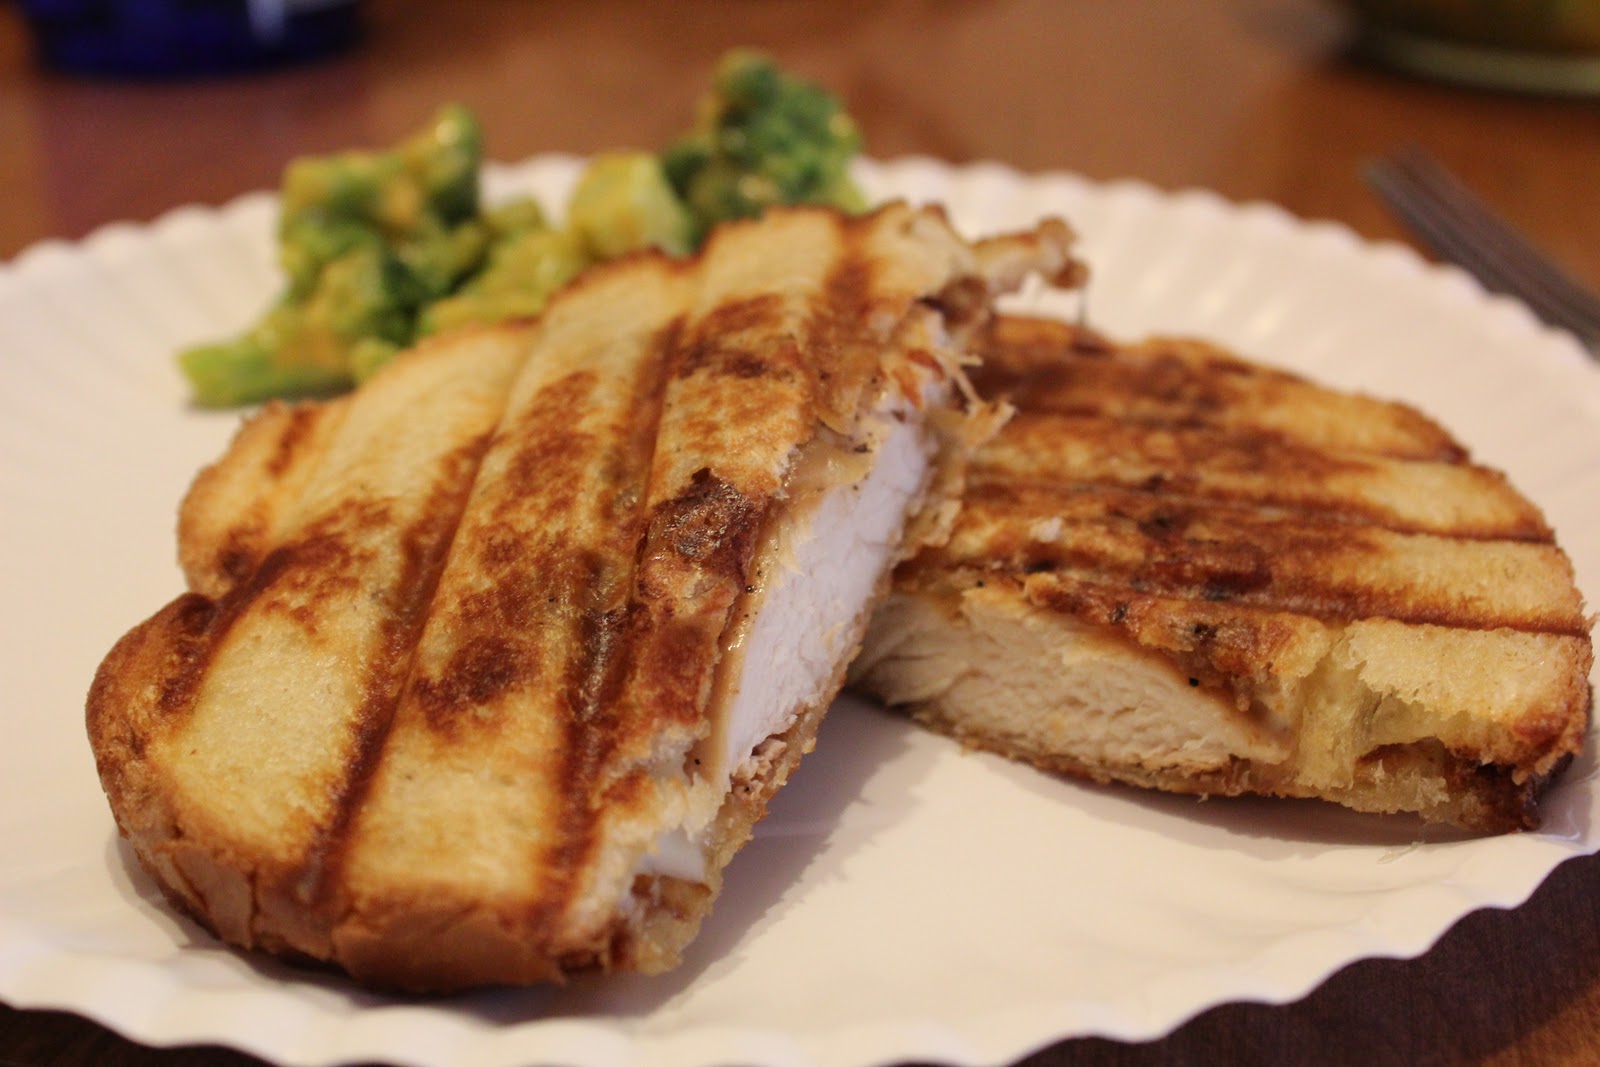
Preheat Foreman grill or panini maker.  Butter one side of each slice of bread.  On unbuttered side, place desired ingredients.  Top with other slice of bread, buttered side up.  Carefully place on panini maker or Foreman grill.  Apply some pressure to the top of the Foreman grill or panini maker.  Allow to grill until crisp and lightly browned.  Be creative with your toppings and combinations and enjoy!


I used caramelized onions in this one.


The top of the Foreman grill gets a bit hot, so I used a hot pad to push it down.

Thursday, September 29, 2011

Homemade Breadcrumbs and Turkey Meatloaf


I need to begin this post with an apology.  It should have been up yesterday, but I just couldn't get it pulled together.  April came down with something last week.  She was kind and shared it with Lukas, who passed it on to Koda, who gave it to Keanna.  My days have been filled with caring for my beloved little ones and turkey meatloaf just wasn't a priority.

I rarely buy ground turkey because it is usually over my $2/lb. spending limit for meat.  And Robbie is not a big fan.  But a few months ago, Safeway had it for under $2/lb.  I bought a bunch, packaged it up, and froze it.  To boost the flavor and moistness of this meatloaf, I mixed the ground turkey with an equal amount of ground beef.

If you follow the quantities I give in the recipe below, you will end up with a lot of filler in your meatloaf.  I do this to stretch it out--meat is expensive.  If you want less filler, simply use half the amount of vegetables.

I used homemade breadcrumbs made with leftover bread from when I made croutons.  Simply put the stale bread cubes in your food processor and pulse until desired coarseness.


Turkey Meatloaf
1/2 lb. ground beef
1/2 lb. ground turkey
2 eggs
1 c. bread crumbs
1 tsp. salt
few dashes pepper
3/4 tsp. garlic powder
1/8 tsp. dry mustard
1 tsp. marjoram
1/2 large onion (about 1 c.)
1/2 large green bell pepper (about 1 c.)
1/2 c. snipped dried tomatoes (not oil packed)
1/8 lb. feta cheese, cubed

Preheat oven to 350 degrees.  Combine meats in large bowl, mixing thoroughly by hand.


Add eggs and mix to combine.  Incorporate bread crumbs, salt, pepper, garlic powder, mustard, and marjoram.


Mix in onion, green pepper, and dried tomatoes.


Working gently, fold in feta cheese, trying not to crumble it too much.


Transfer meat mixture to baking dish, forming into desired loaf shape.  Using finger, poke holes in middle to promote more even cooking.


Bake 45-60 minutes, testing with thermometer for doneness in center (actual baking time will vary greatly depending on shape and thickness of loaf so use a thermometer).  Let rest 5 minutes before cutting.


Don't worry about that icky ooze--it's just coagulated protein
and fat.  Simply scrape it off and discard it.

Monday, September 26, 2011

Pureed Pumpkin


Fall has officially arrived!  Or at least that's what the calendar says, anyway.  We're still waiting for it to feel like fall, but I'm already thinking about fall cooking - soups, pumpkin bread, pecan pie.  One of our favorite fall treats is pumpkin bread.  Up until last fall, I'd always used canned pumpkin, but I happened to come across some sugar pumpkins on sale one day, so I figured I'd give homemade pumpkin a try.  I was surprised at how much better the bread tasted when I used my homemade pureed pumpkin as opposed to the canned variety.  It also ended up being cheaper than buying canned pumpkin.  I must apologize that I don't have the price breakdown, since it was a year ago.  If I make pumpkin again this year, I'll be sure to measure my yield and post the price differences.

Pureed Pumpkin
1 sugar pumpkin
Butter, melted
1 cup water

Preheat oven to 350 degrees.

Line a baking sheet with foil.  Wash outside of pumpkin and pat dry.  Cut pumpkin in half from top to bottom; clean out seeds and membrane.


Don't throw out the seeds!!!  They make delicious snacks!
Brush rims of pumpkin halves with melted butter; place cut sides down on prepared baking sheet.  Add 1 cup of water to the baking sheet.


Place pumpkin in oven and roast for 60 - 90 minutes, or until the flesh is tender.  When pumpkin is cool enough to handle, scrape the flesh out of the skin.  To get a smooth texture, puree in a food processor.

The pumpkin should be tender enough that the spoon just slides right through it.

Nothing left but the skin!


Pureed pumpkin can be used immediately or frozen for later use.  Unfortunately, the USDA does not recommend canning pumpkin puree.  If you would like to can pumpkin, it should be canned in cubed form, not pureed form.  Instructions for canning cubed pumpkin can be found here.

Friday, September 23, 2011

Chicken Salad

One of my husband's favorite lunches (besides leftovers) is chicken salad sandwiches.  Actually, I guess they technically can be considered leftovers, too, because I usually use leftover parts of a whole chicken (see recipes here and here).  This recipe is very flexible - I usually don't measure anything.  Instead, I taste and adjust as I go.  So use this recipe as a guide and make adjustments to suit your family's preferences.

Chicken Salad
2 1/4 cup cubed, cooked chicken
1/2 cup mayonnaise
1/2 cup chopped celery
1 1/2 Tbsp mustard
1 Tbsp lemon juice
Salt and pepper, to taste

Combine all ingredients.  Taste and add ingredients as necessary.  I ended up adding a little more mustard and lemon juice, but you can add as much as you'd like!  Refrigerate.  Serve in sandwiches.

Shredded chicken from a leftover roasted chicken.  Sometimes I just shred it instead of cubing it.


Wednesday, September 21, 2011

Kitchen and Household Sanitation


For the past few years, I’ve been using a 10% bleach solution to sanitize around the house.  I know a lot of people are trying to get away from bleach these days, but I love it!  I know it works.  When I took microbiology lab in college, we ended up with a lot of Petri dishes full of all sorts of microbes.  We opened them all up, put them in the sink, and poured bleach over them.  It’s just so effective.

That being said, take safety precautions when using bleach.  Don’t mix it with other cleaners, make sure there is good ventilation, and limit exposure.

Straight bleach is too strong for household use and is not necessary.  Even when cleaning up blood, the protocol is a 10% bleach solution.  So this is what I used around my bathrooms and kitchen.

A few weeks ago, I was introduced to a new household sanitizer.  Once a month, the women at my church get together for Mary and Martha Monday.  Generally, one of the women gives her testimony and teaches us a skill she has.  This month, we had our first man share with us.

Tim is a professional chef and caterer (find his Facebook page here).  He also teaches ServeSafe classes.  He shared his recipe for an all-purpose cleaning solution.  Not only does it sanitize and disinfect, but it is way cheaper than any disinfectant you would find in the cleaning product aisle.

These products are expensive!

His solution still uses bleach, but in a much lower concentration so I feel comfortable using it everywhere.  The addition of vinegar boosts the disinfecting power.  Both of these are great disinfectants in their own right, but put them together, and you’ve got a super disinfectant.  (Source)

So far I’ve used it on the kitchen counters, stovetop, compost bowl, April’s highchair, dining room table, tile floor, laminate floor, and toilet.  He even suggests using it to wash the shells of eggs that will be used in raw-egg recipes (more on that in the future).

Household Sanitizing Solution
1 gallon water
1 oz. (2 Tbsp.) household bleach
1 oz. (2 Tbsp.) 5% distilled white vinegar (the cheap stuff)

Mix all ingredients in a clean gallon jug.


Be sure to clearly label the jug, including the ingredients and their quantities.

I label it on all sides.

Not only does this give you the recipe next
time you need to make it, but then you have
the exact ingredients and quantities to tell
the doctor or poison control in case of
accidental ingestion.


Pour into spray bottles as needed.

I currently have three of these spread
throughout the house and am going to get
more when I can.

All-purpose Cleaner (for greasy messes, food spills, etc.)
1 batch household sanitizing solution
1-2 Tbsp. castile soap

Mix and dispense into spray bottle.

Monday, September 19, 2011

End of Summer Zucchini and Tomatoes


Autumn starts this week!  I am more excited about the coming of the fall season than I have ever been--pumpkin bread, crisp air, hearty chili, sweaters, crunchy leaves!!  I love it!

But, alas, the coming of fall also means the end of the summer harvest.  I am using up the last of my tomatoes and zucchini and will soon have to resort to buying those red baseballs at the store that they label as tomatoes.  While I am sad that there will be no more garden-fresh veggies for a while, I can say I am ready to be done processing tomatoes.  All that blanching, peeling, cooking, chopping, and pureeing is very taxing, especially when you have four kids vying for your attention.

With all that said, I am now resorting to easy ways to use up the last of the harvest.  And I have to say, this is one of my favorite that I've come up with so far.  The key is to turn the heat off before adding the tomatoes so they don't cook, but just heat.  Mmmm!!  So juicy and fresh!

End of Summer Zucchini and Tomatoes
1-2 Tbsp. olive or vegetable oil
1 large zucchini
Salt, to taste
Pepper, to taste
Garlic powder, to taste
about 1/4 c. balsamic vinegar
about 4 large tomatoes

That's a BIG zucchini!

Heat skillet over medium-high heat.  Add oil.  Meanwhile, cut zucchini into bite-sized pieces.


Add to skillet and season to taste with salt, pepper, and garlic powder.  Cook, stirring occasionally until zucchini is almost done.


Meanwhile, cut tomatoes into wedges.  A few minutes before zucchini is desired tenderness, add balsamic vinegar and continue to cook until just about done.  Turn off heat and add tomatoes.  Gently toss to heat tomatoes.


Turn gently to keep tomatoes intact.

Tomatoes are heated but not cooked--perfect!

Friday, September 16, 2011

Welsh Rabbit


Let me start this post with a disclaimer.  While the point of our blog is typically cheap, nutritious, delicious meals, this one is neither cheap nor nutritious, but it is delicious.  Sumiko once discussed how she occasionally strays from her price limits for special occasions.  Well, we had one such occasion last week - my daughter's third birthday!  I wanted her day to be special, so I planned a special breakfast and lunch.  The lunch consisted of one of my favorite childhood meals, Welsh rabbit (or Welsh rarebit).  Our mom didn't make it very often, so it was always a special treat when she did.  This was the first time I made it for my daughter and she LOVED it!

Welsh Rabbit
2 Tbsp butter
3 Tbsp flour
1/8 - 1/4 tsp salt
Pinch dry mustard
1/4 tsp Worcestershire sauce
1 cup milk
6 oz. processed American cheese block (i.e. Velveeta), cubed
1/2 loaf French bread, cubed


In a saucepan over medium heat, melt butter.  Stir in flour, salt, mustard, and Worcestershire.

I forgot to add the mustard and Worcestershire when I put the flour in, so this is right before I put them in.
Cook, stirring for about 1 minute.  Add milk; cook, stirring until thickened.  Reduce heat to medium-low; add cheese.


Cook, stirring constantly until cheese is melted.


Serve with cubed French bread.


Related Posts with Thumbnails