Since my little sweet potato has now mastered cereals, veggies, fruits, and meats, I decided to start introducing more texture into her food. She is now nine months old. She was probably ready for more texture a while ago; some babies will not be ready until later. Each baby is different so feel yours out and use your instincts. Keep in mind that any front teeth they have will not aid in chewing so you still need to make food soft enough to gum.
The first chunky thing I fed April was fat-free refried beans. These are my normal refried beans that I feed the rest of my family. She absolutely loved them and didn't even seem to notice that there were little chunks of bean.
Since she did so well with the refried beans, I figured she was ready for some pasta. I made spaghetti for my family last night. I simply took some of the noodles and chopped them into small pieces that could be swallowed. I used my Pampered Chef chopper to do this. A knife does work, but takes a lot more time and effort.
The rest of my family ate their spaghetti with marinara sauce. But all three of my older kids would get diaper rashes when I fed them acidic foods at this age, so I didn't even try it on April. Instead, I mixed her pasta into some squash I had in my freezer.
Once again, my little eater gladly accepted the new food.
She even clapped about it.
The kitchen diaries of two sisters on a mission to feed their families and save money. Healthy. Delicious. Affordable.
Pages
▼
Saturday, April 30, 2011
Friday, April 29, 2011
Breaded Pork Chops
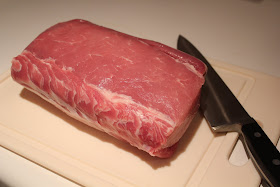
Growing up, we ate pork chops that had been salted and peppered, then broiled. We liked them (especially with A1 Sauce), but since then, we've both discovered other ways of preparing them. Sumiko wrote about how she pan fries hers here. I recently found boneless pork loin on sale, so I bought one, knowing I'd be able to get more than one meal out of it. I hadn't ever used a pork loin before, so I went searching for recipes. I came across a lot of pork chop recipes, which looked delicious, but there was one in particular that stood out to me. I sliced four chops off the loin and froze the rest of the loin to use in another recipe at a later time.
I like thin pork chops, so I cut mine quite thin (approx. 1/3-inch). |
Breaded Pork Chops
4 boneless pork chops
Salt and pepper, to taste
1/4 cup flour
2 eggs
1/2 cup panko (Japanese bread crumbs)
1/8 cup grated Parmesan
2 tsp dried parsley
Olive oil
Lemon juice, A1, or BBQ sauce
Place pork chops between plastic wrap in a single layer; pound to tenderize. Salt and pepper both sides of the meat; set aside.
To bread the pork chops, you'll need 2 plates (or pie pans) and a bowl. On one plate, place your flour. In the bowl, put your eggs, and beat well. On the last plate, mix the panko, Parmesan, and parsley.
Coat the bottom of a large skillet with olive oil and preheat over medium-high heat. In the meantime, dip pork chops in flour, egg, then in the panko mixture. Set aside until the pan is hot.
Place the pork chops in a single layer on the bottom of the skillet, which should be hot enough that they sizzle when you put them in. Cook 3-4 minutes per side (depending on thickness), or until the breading is golden brown and they reach an internal temperature of 160 degrees.
Lightly, drizzle with lemon juice or serve with A1 or BBQ sauce for dipping.
Wednesday, April 27, 2011
Deviled Eggs
If you still have hard boiled Easter eggs in your fridge, better use them up quickly. One of Robbie's favorite ways to eat hard boiled eggs is deviled eggs. They are very simple, yet packed with flavor.
I don't add any special ingredients to mine. You can experiment with different additions such as relish, cayenne pepper, or different types of mustard. Once I accidentally made them with a Miracle-Whip type spread, and they turned out good.
Deviled Eggs
6 eggs, hard boiled
1/4 c. mayonnaise
1 Tbsp. prepared yellow mustard
1/8-1/4 tsp. salt
Dash pepper
Paprika
Peel and rinse eggs. Cut eggs in half longways.
Put yolks in small mixing bowl; mash with fork.
Add mayonnaise, mustard, salt, and pepper; mix well.
Spoon yolk mixture into piping bag fitted with large star tip. Pipe back into egg whites.
If you don't have piping tips, simply spoon mixture back into whites.
Sprinkle tops with paprika.
Put yolks in small mixing bowl; mash with fork.
Add mayonnaise, mustard, salt, and pepper; mix well.
Spoon yolk mixture into piping bag fitted with large star tip. Pipe back into egg whites.
If you don't have piping tips, simply spoon mixture back into whites.
Not as pretty, but tastes just as good. |
Sprinkle tops with paprika.
Monday, April 25, 2011
Crayons
Sumiko said we'd be writing a deviled egg recipe this morning to use up those leftover Easter eggs. I have to admit and apologize that time just seemed to escape us and it never got done (that seems to happen when we're together). So instead we have a "recipe" inspired by Sumiko's crayon-eater. Don't worry, we will be posting the deviled egg recipe this week!
If your kids are anything like my daughter, you will end up with more broken crayons than whole crayons. In fact, many crayons will be in such small pieces that they're virtually unusable. Instead of throwing them out, we use them to make bigger, multi-colored crayons! And one of the best parts about this for my daughter was being able to unwrap the crayons (well, the ones that she hadn't already unwrapped, anyway)!
Homemade Multi-colored Crayons
Crayon pieces, unwrapped
Muffin tin (optional)
Aluminum foil
Cupcake wrappers
Preheat oven to 325 degrees. Line muffin tins with aluminum foil (if you don't line them, some of the wax will soak through the cupcake wrappers and stick to your pan, which can be cleaned off, but won't be fun). Place a cupcake wrapper (or wrappers) into the lined muffin tin.
Fill wrapper with crayons (the amount of crayons you put in will determine how thick your crayons will be).
I love these chubby fingers! |
Place in the oven for 30 minutes, or until crayons are melted into one big crayon.
If you leave them in too long, they will liquify too much and the colors will combine, turning into a brownish color. Remove from the oven and allow to cool completely. Take the wrappers of the crayons and color away!
If you don't have a muffin tin, you can simply make a mold out of the foil and place the cupcake wrapper into the foil mold.
Saturday, April 23, 2011
Baby Food: Finger Snacks and Chicken
April has had two teeth for a couple months now and has been trying them out on everything: toys, her clothing, our fingers. If it fits in her mouth, she’ll chew it. If it doesn’t fit in her mouth, she’ll lick it. She is a very oral baby. About two weeks ago, I decided it was time to start her on some crunchy foods so she could practice biting off pieces and chewing them.
I caught April trying her teeth on a black crayon. |
I’ve tried twice now to make homemade rice rusks—both attempts were failures. I’m hoping to develop a good recipe in the next few weeks. If and when I do figure it out, I’ll definitely let you know.
Once April got the hang of the rice rusks, we started giving her Cheerios. Dry cereal is another thing I don’t usually buy, but it is great to help babies learn fine motor skills while practicing eating non-pureed food. Cheerios also have added sugar but have very little compared to most other dry cereals. Because they get soggy and dissolve to mush real easily, babies can eat them before they’ve really figured out chewing.
As a disclaimer, I must mention that babies can choke on Cheerios, just as the can choke on any small piece of food or small object. Please exercise caution when allowing your baby to feed herself any type of food. The holes in Cheerios do make them a safer choice than other shapes of cereal. If one gets lodged in the throat, it is possible for air to flow through the hole.
Since April has pretty much gone through all the basic grains, vegetables, and fruits, I started her on meat this week. Chicken is a great one to start with because it is inexpensive and easy to prepare. I used leg quarters because they were on sale, but any chicken pieces will do. If you use only breasts, you will need to add more cooking juices or water.
Don’t be afraid to feed your baby the same chicken you eat, even if it is seasoned. There is no reason to prepare plain, unseasoned meat specifically for baby as long as the seasonings are not too strong for baby’s pallet.
If your baby does not take to meat at first, try a different texture or wait a couple weeks and try again. You can also mix it into veggies she already likes.
Chicken for Baby
Cooked chicken (baked, boiled, sautéed, roasted, grilled, etc.)
Liquid (cooking juices, broth, stock, water, veggie pot liquor)
For a smoother texture, puree chicken with liquid to desired consistency. For a coarser texture, chop finely across grain with a sharp knife. Add liquid to desired consistency.
At this point, you can mix foods so baby gets a meat, a starch, and a veggie all in one meal. You can either feed them different foods separately, or you can mix chicken, rice, and green beans together to make a “casserole.”
A word of warning: meat will probably change the contents of your baby’s diapers. Don’t be alarmed if you discover her diapers are becoming more pungent.
"I didn't do anything wrong!" |
Friday, April 22, 2011
Red Beet Eggs
The Easter egg hunt is over. The kids are on a sugar high, and you’ve got a dozen dyed hard boiled eggs in your fridge. What to do with them? Two classics come to my mind: egg salad and deviled eggs. Kimiko will share her deviled egg recipe on Monday. But there’s another way to use up those eggs: red beet eggs.
This is another one of our great grandmother’s recipes. We grew up eating these Pennsylvania Dutch pickled eggs. While they might sound strange, I encourage anyone who likes pickled foods to give them a try. If you don’t like the idea of pickled eggs, you can omit the eggs and just make pickled beets.
When I have beets from my garden, I like to use those. But canned beets produce a great product too. Just be sure to buy straight beets and not pickled beets. Sliced or whole work.
The longer the eggs stay in the vinegar mixture, the more they will soak up the color and flavor. When we were kids, Kimiko would wait until the yolk turned red. If they are left in too long, however, they will start to get rubbery.
1 can beets with liquid (about 1 pint)
1 c. cider vinegar
⅓ c. vinegar
¾ tsp. salt
¼ c. sugar (more or less to taste)
8 eggs, hard-boiled and shelled
In medium saucepan, combine beets (with liquid), both vinegars, salt, and sugar. Heat until sugar is dissolved. Remove from heat and let cool to room temperature.
Place eggs in medium-sized container with tight-fitting lid. Pour beet mixture over eggs. Add water if necessary to cover all eggs.
This is a six-cup container. |
Refrigerate 2-3 days or until pickled to preference.
One-day eggs. |
Two-and-a-half-day eggs. |
Three-day eggs. Notice there's no white left! |